2015年12月31日 星期四

C# - 影像處理圖片銳化、對比延伸、直方圖均化

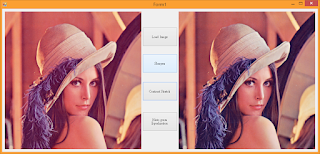
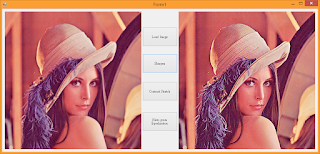
練習:
銳化:Sharpen()

對比延伸:ContrastStretch()

直方圖均化:HistogramEqualization()
##ReadMore##

Step1. 檔案 → 新增專案 → Windows Form 應用程式 → 拉物件 Form1.cs[設計] → 撰寫 Form1.cs

Step2. 方案總管 → 參考 → 右鍵加入參考 → 瀏灠(預設路徑) C:\Program Files (x86)\AForge.NET\Framework\Release → 加入參考
  • AForge.Imaging.dll 
  • AForge.Imaging.Formats.dll

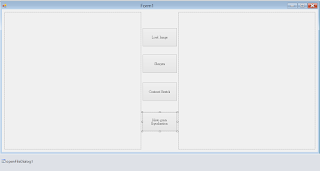
Step3. Windows Form 拉入需要工具:

  • pictureBox × 2
  • button × 4
  • openFileDialog × 1


Step4. Coding
using System;
using System.Collections.Generic;
using System.ComponentModel;
using System.Data;
using System.Drawing;
using System.Linq;
using System.Text;
using System.Windows.Forms;

using AForge.Imaging;
using AForge.Imaging.Formats;
using AForge.Imaging.Filters;

namespace TMV0
{
    public partial class Form1 : Form
    {
        public Form1()
        {
            InitializeComponent();
        }

        Bitmap imgone;

        //Sharpen
        private void button2_Click(object sender, EventArgs e)
        {
            Bitmap img;
            Sharpen filter = new Sharpen();
            img = filter.Apply(imgone);
            pictureBox2.Image = img;
        }

        //Contrast Stretch
        private void button3_Click(object sender, EventArgs e)
        {
            Bitmap img;
            ContrastStretch filter = new ContrastStretch();
            img = filter.Apply(imgone);
            pictureBox2.Image = img;
        }

        //Load Image
        private void button1_Click(object sender, EventArgs e)
        {
            openFileDialog1.Filter = "所有檔案(*.*)|*.*";
            if (openFileDialog1.ShowDialog() == DialogResult.OK)
            {
                imgone =
                ImageDecoder.DecodeFromFile(openFileDialog1.FileName);
                pictureBox1.Image = imgone;
            }
        }

        //Histogram Equalization
        private void button4_Click(object sender, EventArgs e)
        {
            Bitmap img;
            HistogramEqualization filter = new HistogramEqualization();
            img = filter.Apply(imgone);
            pictureBox2.Image = img;
        }

        private void Form1_Load(object sender, EventArgs e)
        {

        }
    }
}

C# - 影像處理圖片灰階、黑白、邊緣化、B-Channel

練習濾鏡(Filter)特效:
  • 灰階 : Grayscale()
  • 黑白(二階):Grayscale() → OtsuThreshold()
  • 邊緣化 : Grayscale() → OtsuThreshold() → CannyEdgeDetector() 
  • B-Channel → ExtractChannel(RGB.B)
##ReadMore##

Step1. 檔案 → 新增專案 → Windows Form 應用程式 → 拉物件 Form1.cs[設計] → 撰寫 Form1.cs

Step2. 方案總管 → 參考 → 右鍵加入參考 → 瀏灠(預設路徑) C:\Program Files (x86)\AForge.NET\Framework\Release → 加入參考
AForge.Imaging.dll
AForge.Imaging.Formats.dll

Step3. Windows Form 拉入需要工具:
  • pictureBox × 2
  • button × 6
  • openFileDialog × 1 
  • saveFileDialog × 1

Step4. coding
using System;
using System.Collections.Generic;
using System.ComponentModel;
using System.Data;
using System.Drawing;
using System.Linq;
using System.Text;
using System.Windows.Forms;

using AForge.Imaging.Formats;
using AForge.Imaging.Filters;
using AForge.Imaging;

namespace Lesson_p90
{
    public partial class Form1 : Form
    {
        Bitmap img1, img2;

        public Form1()
        {
            InitializeComponent();
        }

        private void button1_Click(object sender, EventArgs e)
        {
            openFileDialog1.Filter = "所有檔案(*.*)|*.*";
            if (openFileDialog1.ShowDialog() == DialogResult.OK)
            {
                img1 = ImageDecoder.DecodeFromFile(openFileDialog1.FileName);
                pictureBox1.Image = img1;
            }
        }

        private void button2_Click(object sender, EventArgs e)
        {
            Grayscale filter = new Grayscale(0.2125, 0.7154, 0.0721);
            img2 = filter.Apply(img1);
            pictureBox2.Image = img2;
        }

        private void button3_Click(object sender, EventArgs e)
        {
            Grayscale grayfilter = new Grayscale(0.2125, 0.7154, 0.0721);
            Bitmap grayImg = grayfilter.Apply(img1);

            OtsuThreshold filter = new OtsuThreshold();
            img2 = filter.Apply(grayImg);
            pictureBox2.Image = img2;

        }

        private void button4_Click(object sender, EventArgs e)
        {
            Grayscale grayfilter = new Grayscale(0.2125, 0.7154, 0.0721);
            Bitmap edgeImg = grayfilter.Apply(img1);

            OtsuThreshold filter = new OtsuThreshold();
            filter.ApplyInPlace(edgeImg);

            CannyEdgeDetector filter2 = new CannyEdgeDetector();
            img2 = filter2.Apply(edgeImg);
            pictureBox2.Image = img2;
        }

        private void button5_Click(object sender, EventArgs e)
        {
            ExtractChannel filter = new ExtractChannel(RGB.B);
            img2 = filter.Apply(img1);
            pictureBox2.Image = img2;
        }

        private void button6_Click(object sender, EventArgs e)
        {
            saveFileDialog1.FileName = @"imgone.bmp";
            saveFileDialog1.Filter = "Bitmap file(*.bmp)|*.bmp";
            if (saveFileDialog1.ShowDialog() == DialogResult.OK)
            {
                img2.Save(saveFileDialog1.FileName);
            }
        }
    }
}

C# - 影像處理圖片像素 RGB 值

練習:
  • 使用 getPixel() 方法來截取圖片每點像素,進一步得到該點 RGB 值。
  • 使用 setPixel () 方法來重設圖片。
  • 結合 for-loop。
  • 練習一、將圖片一半斜角變成黑色。
 
  • 練習二、指定一座標點(單位 pixel),將該點變成黑色。
##ReadMore##

練習一、
Step1. 檔案 → 新增專案 → Windows Form 應用程式 → 拉物件 Form1.cs[設計] → 撰寫 Form1.cs

Step2. 使用圖檔 lena.png 

Step3. 方案總管 → 參考 → 右鍵加入參考 → 瀏灠(預設路徑) C:\Program Files (x86)\AForge.NET\Framework\Release → 加入參考
  • AForge.Imaging.dll
  • AForge.Imaging.Formats.dll

Step4. Windows Form 拉入需要工具:
  • pictureBox × 2
  • button × 4
  • openFileDialog × 1 
  • saveFileDialog × 1

Step5. Coding
using System;
using System.Collections.Generic;
using System.ComponentModel;
using System.Data;
using System.Drawing;
using System.Linq;
using System.Text;
using System.Windows.Forms;

using AForge.Imaging;
using AForge.Imaging.Formats;

namespace Lesson_p49
{
    public partial class Form1 : Form
    {
        Bitmap imgone;
        int[,] maR = new int[1024, 1024];
        int[,] maG = new int[1024, 1024];
        int[,] maB = new int[1024, 1024];

        public Form1()
        {
            InitializeComponent();
        }

        private void Form1_Load(object sender, EventArgs e)
        {
            
        }

        private void button1_Click(object sender, EventArgs e)
        {
            openFileDialog1.Filter = "所有檔案(*.*)|*.*"; 
            if (openFileDialog1.ShowDialog() == DialogResult.OK)
            {
                imgone = ImageDecoder.DecodeFromFile(openFileDialog1.FileName);
                
                pictureBox1.Image = imgone;
            }
        }

        private void button2_Click(object sender, EventArgs e)
        {
            for (int i = 1; i < imgone.Width; i++)
            {
                for (int j = 1; j < imgone.Height; j++)
                {
                    Color pixelColor = imgone.GetPixel(i, j); 
                    maR[i, j] = pixelColor.R;
                    maG[i, j] = pixelColor.G;
                    maB[i, j] = pixelColor.B;
                }
            }
        }

        private void button3_Click(object sender, EventArgs e)
        {
            for (int i = 1; i < imgone.Width; i++)
            {
                for (int j = 1; j < imgone.Height; j++)
                {
                    if (i < j)
                    {
                        maR[i, j] = 0; 
                        maG[i, j] = 0; 
                        maB[i, j] = 0;
                    }
                    Color pixelColor = Color.FromArgb(maR[i, j], maG[i, j], maB[i, j]);
                    imgone.SetPixel(i, j, pixelColor);
                }
            }
            pictureBox2.Image = imgone; 
        }

        private void button4_Click(object sender, EventArgs e)
        {
            saveFileDialog1.FileName = @"imgone.bmp"; 
            saveFileDialog1.Filter = "Bitmap file (*.bmp)|*.bmp"; 
            if (saveFileDialog1.ShowDialog() == DialogResult.OK)
            {
                imgone.Save(saveFileDialog1.FileName);
            } 
        }
    }
}

---
練習二、
Step1. 檔案 → 新增專案 → Windows Form 應用程式 → 拉物件 Form1.cs[設計] → 撰寫 Form1.cs

Step2. 方案總管 → 參考 → 右鍵加入參考 → 瀏灠(預設路徑) C:\Program Files (x86)\AForge.NET\Framework\Release → 加入參考
  • AForge.Imaging.dll
  • AForge.Imaging.Formats.dll
Step3. 編輯 Windows Form
  • pictureBox × 2
  • button × 3
  • openFileDialog × 1 
  • saveFileDialog × 1
  • Label × 2
  • textBox × 2

Step4. coding
using System;
using System.Collections.Generic;
using System.ComponentModel;
using System.Data;
using System.Drawing;
using System.Linq;
using System.Text;
using System.Windows.Forms;

using AForge.Imaging.Formats;
using AForge.Imaging;


namespace RGBshow
{
    public partial class Form1 : Form
    {
        Bitmap imgInput, imgone, imgtwo;
        int[,] maR = new int[1024, 1024];
        int[,] maG = new int[1024, 1024]; 
        int[,] maB = new int[1024, 1024];
        
        public Form1()
        {
            InitializeComponent();

        }

        private void button1_Click(object sender, EventArgs e)
        {
            openFileDialog1.Filter = "所有檔案(*.*)|*.*";
            if (openFileDialog1.ShowDialog() == DialogResult.OK)
            {
                imgone = ImageDecoder.DecodeFromFile(openFileDialog1.FileName);
                imgtwo = imgone;
                pictureBox1.Image = imgone;
                pictureBox2.Image = imgtwo;
                label4.Text = string.Format("({0} × {1})", imgone.Width, imgone.Height);
            }
        }

        private void button5_Click(object sender, EventArgs e)
        {
            saveFileDialog1.FileName = @"imgtwo.bmp";
            saveFileDialog1.Filter = "Bitmap file (*.bmp)|*.bmp";
            if (saveFileDialog1.ShowDialog() == DialogResult.OK)
            {
                imgtwo.Save(saveFileDialog1.FileName);
            } 
        }


        private void button2_Click(object sender, EventArgs e)
        {
            //Get textBox input value
            int x = int.Parse(textBox1.Text);
            int y = int.Parse(textBox2.Text);
                        
            //保存原圖像素顏色            
            for (int i = 1; i < imgone.Width; i++)
            {
                for (int j = 1; j < imgone.Height; j++)
                {
                    Color pixelColor = imgone.GetPixel(i, j);
                    maR[i, j] = pixelColor.R;
                    maG[i, j] = pixelColor.G;
                    maB[i, j] = pixelColor.B;
                }
            }
           
            
            //繪製單點座標(x, y)
            maR[x, y] = 0;
            maG[x, y] = 0;
            maB[x, y] = 0;

            for (int i = 1; i < imgone.Width; i++)
            {
                for (int j = 1; j < imgone.Height; j++)
                {
                    Color pixelColor = Color.FromArgb(maR[i, j], maG[i, j], maB[i, j]);
                    imgtwo.SetPixel(i, j, pixelColor);
                }
            }
            pictureBox2.Image = imgtwo; 
        }

        private void textBox1_TextChanged(object sender, EventArgs e)
        {

        }

        private void textBox2_TextChanged(object sender, EventArgs e)
        {

        }

        private void Form1_Load(object sender, EventArgs e)
        {

        }


    }
}

C# - 載入 AForge 參考實作「讀取」及「另存」圖片

練習:
  • 載入 AForge.NET 參考
  • 實作 openFileDialog 讀圖
  • 實作 saveFileDialog 存圖
其中讀圖的方式可以:
  1. 開啟檔案「手動」瀏灠器載入圖。
  2. 以絕對路徑「自動」載入圖。
  3. 將圖放至專案/bin/Debug 目錄內「自動」載入圖。
##ReadMore##

Step1.
檔案 → 新增專案 → Windows Form 應用程式 → 拉物件 Form1.cs[設計] → 撰寫 Form1.cs

Step2.
方案總管 → 參考 → 右鍵加入參考 → 瀏灠(預設路徑) C:\Program Files (x86)\AForge.NET\Framework\Release → 加入參考
  • AForge.Imaging.dll
  • AForge.Imaging.Formats.dll

Step3.
拉入 Windows Form:
  • pictureBox × 1
  • button × 4
  • openFileDialog × 1
  • saveFileDialog  × 1

Step4. Coding
using System;
using System.Collections.Generic;
using System.ComponentModel;
using System.Data;
using System.Drawing;
using System.Linq;
using System.Text;
using System.Windows.Forms;

using AForge.Imaging;
using AForge.Imaging.Formats;


namespace Lesson_8
{
    public partial class Form1 : Form
    {
        Bitmap imgone;

        public Form1()
        {
            InitializeComponent();
        }

        private void button1_Click(object sender, EventArgs e)
        {
            // 手動讀圖 → 開啟檔案瀏灠器
            openFileDialog1.Filter = "所有檔案(*.*)|*.*";
            if(openFileDialog1.ShowDialog()==DialogResult.OK){
                imgone =ImageDecoder.DecodeFromFile(openFileDialog1.FileName); 
                pictureBox1.Image = imgone;
            }
        }

        private void button2_Click(object sender, EventArgs e)
        {
            saveFileDialog1.FileName = @"imgone.bmp";
            saveFileDialog1.Filter = "Bitmap file(*.bmp)|*.bmp";
            if (saveFileDialog1.ShowDialog() == DialogResult.OK)
            {
                imgone.Save(saveFileDialog1.FileName);
            }
        }

        private void button3_Click(object sender, EventArgs e)
        {
            // 自動讀圖 → 絕對路徑
            imgone = ImageDecoder.DecodeFromFile(@"D:\Visual C Sharp\Img\lana.png");
            pictureBox1.Image = imgone;
        }

        private void button4_Click(object sender, EventArgs e)
        {
            // 自動讀圖2 → 圖檔要放至「專案/bin/Debug」目錄
            imgone = ImageDecoder.DecodeFromFile("lana.png");
            pictureBox1.Image = imgone;
        }

        private void Form1_Load(object sender, EventArgs e)
        {

        }
    }
}

C# - 練習 textBox 及 button 做等差相加、等差相乘

練習 textBox 及 button 做:
  • 等差相加( textBox1 累加到 textBox2)
  • 等差相乘( textBox1 累乘到 textBox2)
##ReadMore##
檔案 → 新增專案 → Windows Form 應用程式 → 拉物件 Form1.cs[設計] → 撰寫 Form1.cs
拉入 Windows Form :
  • textBox × 4
  • Label × 5
  • button × 1
程式:
using System;
using System.Collections.Generic;
using System.ComponentModel;
using System.Data;
using System.Drawing;
using System.Linq;
using System.Text;
using System.Windows.Forms;

namespace test2
{
    public partial class Form1 : Form
    {
        public Form1()
        {
            InitializeComponent();
        }

        private void button1_Click(object sender, EventArgs e)
        {
            int sum=0, inputA, inputB;
            long multiplied = 1;
            inputA = int.Parse(textBox1.Text);
            inputB = int.Parse(textBox2.Text);
            for (int i = inputA; i <= inputB; i++)
            {
                sum = sum + i;
            }
            
            for (int j = inputA; j <= inputB; j++)
            {
                multiplied = multiplied * j;
            }
             
            textBox3.Text = sum.ToString();
            textBox4.Text = multiplied.ToString();
        }

        private void textBox1_TextChanged(object sender, EventArgs e)
        {

        }

        private void textBox2_TextChanged(object sender, EventArgs e)
        {

        }
    }
}

C# - 做猜數字遊戲 (1~20)

練習做一個猜數字文字遊戲:
  • 數字範圍 1~20
  • 只能猜 5 次
  • 計算所猜數字總合之平均
##ReadMore##
using System;
using System.Collections.Generic;
using System.Linq;
using System.Text;

namespace test01
{
    class Program
    {
        static void Main(string[] args)
        {
            int min = 1, max = 20;
            Random r = new Random();
            int ans = r.Next(min, max);
            int count = 0;
            int sum = 0;
            float average = 0.0f;
            int[] guess = new int[5];
            
            Boolean flags = false;

            Console.WriteLine("ans {0}", ans);

            Console.WriteLine("亂數產生 1~20 整數,猜一個數…");
            while (flags == false)
            {
                if (count >= 5)
                {
                    Console.WriteLine("=============================");
                    Console.WriteLine("五次機會用完了!");
                    flags = true;
                }
                else
                {
                    Console.WriteLine("------------ 猜第 {0}/5 次 ---------------", count+1);
                    Console.WriteLine("猜測範圍 {0}~{1}:", min, max);
                    guess[count] = int.Parse(Console.ReadLine());

                    if (guess[count] == ans)
                    {
                        Console.WriteLine("Bingo !");
                        flags = true;
                    }
                    else if (guess[count] < ans)
                    {
                        Console.WriteLine("猜太小,再猜一次");
                        min = guess[count];
                    }
                    else if (guess[count] > ans)
                    {
                        Console.WriteLine("猜太大,再猜一次");
                        max = guess[count];
                    }
                    count++;
                }
            }
            Console.WriteLine("========= 遊戲結束 =========");
            Console.Write("你猜的數目分別是:");
            for (int i = 0; i < count; i++)
            {
                Console.Write("{0} ", guess[i]);
                sum = sum + guess[i];
            }
            average = sum / count;
            Console.Write(",平均:{0}", average);
            Console.Read();
        }
    }
}

C# - 陣列 Array

練習陣列 Array 之宣告及使用(其他宣告考參):

  • 輸入 5 個正整數並計算相加總合 sum

##ReadMore##
檔案 → 新增專案 → 主控台應用程式 → 撰寫 Program.cs

using System;
using System.Collections.Generic;
using System.Linq;
using System.Text;

namespace Leeson_A._8
{
    class Program
    {
        static void Main(string[] args)
        {
            int k;
            int[] arr = new int[5];
            Console.WriteLine("====由鍵盤連續輸入五個整數值到 arr 陣列:\n");
            for (k = 0; k < 5; k++)
            {
                Console.Write("arr[{0}] = ", k);
                arr[k] = int.Parse(Console.ReadLine());
            }
            Console.WriteLine();
            Console.WriteLine("==== arr 陣列的元素內容");

            int sum = 0;
            foreach (int item in arr)
            {
                Console.Write(" " + item);
                sum += item;
            }
            Console.WriteLine();
            Console.WriteLine();
            Console.WriteLine(" arr 陣列的元素總和為: {0}", sum);
            Console.Read();
        }
    }
}

C# - switch-case 及 while-loop

練習 switch-case 及 while-loop :

  • 輸入整數(1~12)表示月份,自動判斷季節。

##ReadMore##
檔案 → 新增專案 → 主控台應用程式 → 撰寫 Program.cs
using System;
using System.Collections.Generic;
using System.Linq;
using System.Text;

namespace Lesson_A._5
{
    class Program
    {
        static void Main(string[] args)
        {
            Boolean flag = false;
            while (true)
            {
                Console.WriteLine("===== 請輸入現在月份(1~12 or exit):");
                string month = Console.ReadLine();
                switch (month)
                {
                    case "3":
                    case "4":
                    case "5":
                        Console.WriteLine("現在是春天…");
                        break;
                    case "6":
                    case "7":
                    case "8":
                        Console.WriteLine("現在是夏天…");
                        break;
                    case "9":
                    case "10":
                    case "11":
                        Console.WriteLine("現在是秋天…");
                        break;
                    case "12":
                    case "1":
                    case "2":
                        Console.WriteLine("現在是冬天…");
                        break;
                    case "exit":
                        flag = true;
                        break;
                    default:
                        Console.WriteLine("輸入錯誤…");
                        break;
                }
                if (flag == true)
                    break;
            }           
        }
    }
}

C# - 例外處理 Exception

練習除法除以 0,並使用例外處理不讓程式 error。
##ReadMore##
檔案 → 新增專案 → 主控台應用程式 → 撰寫 Program.cs
練習一:
using System;
using System.Collections.Generic;
using System.Linq;
using System.Text;

namespace Lesson_A._7
{
    class Program
    {
        static void Main(string[] args)
        {
            int i, k, p;
            i = 5;
            k = 0;

            Console.WriteLine("計算:" + i + " / " + k);
            try
            {
                // 嘗試可能發生例外處理的程式
                p = i / k;
            }
            catch (Exception ex)
            {
                // 當例外發生時的處理方式
                Console.WriteLine("發生例外");
                Console.WriteLine(ex.Message);
            }

            finally
            {
                // finally 不管有無發生 Exception 都會執行。
                Console.WriteLine("...沒中斷繼續...");
            }

            for (i = 0; i < 10; i++)
            {
                Console.WriteLine(i);
            }

            Console.WriteLine("The program is over.");
            Console.Read();
        }
    }
}

練習二
using System;
using System.Collections.Generic;
using System.Linq;
using System.Text;

namespace Lesson_A._7_test
{
    class Program
    {
        static void Main(string[] args)
        {
            int i = 10;
            for (; i >= -10; i--)
            {
                try
                {
                    Console.WriteLine(" 100 ÷ {0} = {1}…{2}", i, 100 / i, 100 % i);
                }
                catch (Exception ex)
                {
                    Console.WriteLine("例外訊息:{0}", ex.Message);
                    Console.WriteLine("發生例外的函式:{0}", ex.StackTrace);
                    Console.WriteLine("發生例外的物件:{0}", ex.Source);
                    Console.WriteLine("發生例外的物件型別:{0}", ex.GetType());
                    Console.WriteLine("發生例外的文字說明:{0}", ex.ToString());
                }
            }
            Console.Read();
        }
    }
}

C# - 以 for-loop 做積分 X^2

練習使用 for-loop 來做數學積分:
##ReadMore##
檔案 → 新增專案 → 主控台應用程式 → 撰寫 Program.cs
using System;
using System.Collections.Generic;
using System.Linq;
using System.Text;

namespace test0929
{
    class Program
    {
        static void Main(string[] args)
        {
            int steps = 1000;   // 積分精準度(越高越精準)
            float x, fx, bn, en;
            float ans = 0;

            Console.WriteLine("Integral(X^2) →");

            Console.Write("Float bn = ");
            bn = float.Parse(Console.ReadLine());

            Console.Write("Float en = ");
            en = float.Parse(Console.ReadLine());
            
            float parti = (en - bn) * 1/steps;
            
            for (int i = 0; i < steps; i++)
            {
                x = bn + parti * i;
                fx = x * x;
                ans = ans + fx * parti; 
            }
            Console.WriteLine("計算 x^2 之積分,積分範圍 {0} 到 {1}:", en, bn);
            Console.WriteLine("ans = {0}", ans);
            Console.Read();
        }
    }
}

C# - for-loop

for-loop   練習:

  • 設定一正整數 n (範圍 0~99),印出 0~n

##ReadMore##
檔案 → 新增專案 → 主控台應用程式 → 撰寫 Program.cs
using System;
using System.Collections.Generic;
using System.Linq;
using System.Text;

namespace Leson_A._4
{
    class Program
    {
        static void Main(string[] args)
        {
            int n;

            Console.Write("Please keyin a number(0-99):");
            n = int.Parse(Console.ReadLine());

            for (int i = 0; i<100 data-blogger-escaped-break="" data-blogger-escaped-console.read="" data-blogger-escaped-console.writeline="" data-blogger-escaped-i="" data-blogger-escaped-if="" data-blogger-escaped-n="=" data-blogger-escaped-pre="">

2015年12月30日 星期三

C# - if-else

練習 if-else 判斷式,練習:
  • 輸入兩正整數值,比大小。
  • 判斷一正整數值,是奇數、偶數?

##ReadMore##
檔案 → 新增專案 → 主控台應用程式 → 撰寫 Program.cs
using System;
using System.Collections.Generic;
using System.Linq;
using System.Text;

namespace Lesson_A._3
{
    class Program
    {
        static void Main(string[] args)
        {
            int n1, n2, n3;
            Console.WriteLine("數字比大小,比較 n1 及 n2…");
            Console.WriteLine("請輸入第一個整數 (n1) :");
            n1 = int.Parse(Console.ReadLine());

            Console.WriteLine("請輸入第二個整數 (n2) :");
            n2 = int.Parse(Console.ReadLine());

            Console.WriteLine("比較結果:");
            if (n1 == n2)
                Console.WriteLine("{0} = {1}", n1, n2);
            else if (n1 > n2)
                Console.WriteLine("{0} > {1}", n1, n2);
            else if (n1 < n2)
                Console.WriteLine("{0} < {1}", n1, n2);

            Console.WriteLine("-------------- separate ----------------");
            Console.WriteLine("請輸入一個整數,判斷它是奇數偶數 (n3):");
            n3 = int.Parse(Console.ReadLine());

            Console.WriteLine("判斷結果:");
            if (n3 % 2 == 0)
                Console.WriteLine("{0} 是偶數", n3);
            else
                Console.WriteLine("{0} 是奇數", n3);

            Console.Read();
        }
    }
}

C# - String to int

於主控台做文字互動,並練習 String to int 型態轉換,使用:

  • int.Parse(String);

##ReadMore##
檔案 → 新增專案 → 主控台應用程式 → 撰寫 Program.cs
using System;
using System.Collections.Generic;
using System.Linq;
using System.Text;

namespace Lesson_A._2
{
    class Program
    {
        static void Main(string[] args)
        {
            string Name;
            int Age;
            Console.WriteLine("What's your name?");
            Name = Console.ReadLine();

            Console.WriteLine("\nHow old are you?");
            Age = int.Parse(Console.ReadLine());

            Console.WriteLine("\nYou are {0} and {1} years old.", Name, Age);
            Console.ReadLine();        
        }
    }
}

C# - Hello, World

以軟體 Microsoft Virtual C# 寫一個主控台並印出「Hello, World」。

##ReadMore##
檔案 → 新增專案 → 主控台應用程式 → 撰寫 Program.cs
using System;
using System.Collections.Generic;
using System.Linq;
using System.Text;

namespace Lesson_A._1
{
    class Program
    {
        static void Main(string[] args)
        {
            Console.WriteLine("Hello, World");
            Console.Read();
        }
    }
}


2015年12月29日 星期二

Microsoft Virtual C#

本文後續使用的 C# 撰寫軟體為:Microsoft Virtual C# 2010
並且安裝圖像常用之外掛套件:AForge.NET


##ReadMore##

Step 1.
Microsoft Virtual C# 2010 為免費 IDE 軟體,可以至官方或是本站上傳空間來下載。

Step 2.
安裝外掛套件 AForge.NET,可以至官方本站上傳空間來下載。

完成。

IceWM - Path of Prefernaces File

prefernaces是 IceWM 圖形環境設定快捷鍵...等的檔案
此檔案可在下方路徑中找到:

1. /etc/X11/icewm
         -> 可以在此自行建立

2./usr/share/icewm OR /usr/local/share/icewm
        -> 這裡是預設檔位置


參考網址:http://www.icewm.org/manual/icewm-7.html

2015年12月28日 星期一

gsimplecal 圖形化介面月曆

使用 X-Window-System 為 IceWM,於其下方 toolbar 可設立時間條至右下角,
想要點一下就跳出圖形化月曆 (calendar) 之功能,方法:


  • 安裝 gsimplecal 並至 IceWM 設定檔進行設定。 


##ReadMore##

Step1.
Debian/Jessie 直接 APT 進行安裝:
apt-get -y install gsimplecal

Step2.
寫設定檔(可以使用 man gsimplecal 查看詳細設定):
vim ~/.config/gsimplecal/config
show_calendar = 1
show_timezones = 1
mark_today = 1
show_week_numbers = 0
close_on_unfocus = 0
external_viewer = sunbird -showdate "%Y-%m-%d"
clock_format = %Y/%m/%d (%a) %T
force_lang = en_US.utf8
mainwindow_decorated = 1
mainwindow_keep_above = 1
mainwindow_sticky = 0
mainwindow_skip_taskbar = 1
mainwindow_resizable = 1
mainwindow_position = mouse
mainwindow_xoffset = 0
mainwindow_yoffset = 0
clock_label = Taipei
clock_tz = :Asia/Taipei

Step3.
設定 IceWM 之設定檔:
sudo vim /etc/X11/icewm/preferences
#  Command to run on clock
ClockCommand="gsimplecal"

Step4.
完成→測試。

鍵盤操作快捷鍵:

  • Escape, Ctrl+w, Ctrl+q →  Close the window.
  • j    → Switch to the next month.
  • k   → Switch to the previous month.
  • J    → Jump one year forward.
  • K   → Jump one year backward.
  • g, Home → Jump to the current date.


---
Reference:
http://dmedvinsky.github.io/gsimplecal/ 

2015年12月25日 星期五

Setup Android Studio on Debian

於系統環境:Linux / Debian Jessie,安裝 android 程式編譯軟體 Android Studio 之安裝流程筆記。

##ReadMore##


1. 至 Android Studio 官方 下載 Android Studio 及 SDK Tools。

2. 至 Oracle 官方下載 Java JDK

3. 建一個目錄,並將所下載的 3 個檔案解壓縮至該目錄。
fish@debian:~$ mkdir android
fish@debian:~$ cd Downloads/
fish@debian:~/Downloads$ tar xfva jdk-8u65-linux-x64.tar.gz -C ../android
fish@debian:~/Downloads$ unzip android-studio-ide-141.2456560-linux.zip -C ../android
fish@debian:~/Downloads$tar zxvf android-sdk_r24.4.1-linux.tgz -C ../android

4. 設定系統 PATH
fish@debian:~/Downloads$ cd
fish@debian:~$ vim .bashrc

加入剛剛解壓縮之目錄內之 bin 路徑
## Java JDK
export PATH=$PATH:/home/fish/android/jdk1.8.0_65/bin 
export PATH=$PATH:/home/fish/android/jdk1.8.0_65/jre/bin

## Android Studio SDK
export PATH=$PATH:/home/fish/android/android-studio/bin 
export PATH=$PATH:/home/fish/android/android-sdk-linux/tools/bin 
export PATH=$PATH:/home/fish/android/android-sdk-linux/tools

fish@debian:~$ source .bashrc

5. 開始安裝 Android Studio
fish@debian:~$ cd ~/android/android-studio/bin
fish@debian:~$ sh studio.sh

6. 安裝 studio.sh 可能遇到問題訊息: “Unable to run mksdcard SDK tool" 
  • 解決辦法(先確認有沒有 mksdcard 這個指令,若 Tab 不到回去步驟 4. 檢查)
sudo lib32z1 lib32ncurses5 lib32bz2-1.0 lib32stdc++6
---

2015年12月23日 星期三

Roseapple Pi LightDM autologin & Openbox autostart

1. 開機啟動圖形介面(LightDM)自動登入帳號:

首先編輯 LightDM 之設定檔:
$ sudo vim /etc/lightdm/lightdm.conf
將下列內容做修改(將註解拿掉):
autologin-user=username
autologin-user-timeout=0
上方username就是自己的帳號名稱

接下來只要重新開機,就會自動登入帳號至桌面了。

2. OpenBox 自動執行程式:

OpenBox autostart 設定檔:
/etc/X11/openbox/autostart
$HOME/.config/openbox/autostart 

使用者設定檔的優先權高於 /etc/X11/openbox 的內容。使用者通常會直接將 /etc/X11/openbox 內的文件複製到 $HOME/.config/openbox , 然後修改成自己偏好的內容就可以了。

只要將要執行的程式寫入該設定檔中即可,另外需要注意的地方是,程式必須要在背景執行所以必須加入"&",否則會影響到後面的程式。

Reference:

2015年12月22日 星期二

JAVA SL-314_12/20

Date: 12/20
/================================================/

DAO(Data Access Object)資料存取物件
主要的功能是資料操作,屬於資料層的操作

client   →  JSP/Servlet  →  BO  →  DAO  →  Database
客戶層        顯示層          業務層     資料層       資源層

client →  B/S開發架構,大都以Browser進行存取
顯示層 → 以JSP/Servlet進行頁面效果的顯示
Business Object→ 將多個最小的DAO進行組合變成一個業務邏輯--> BO
DAO→ 提拱多個最小性的DAO操作,例如新增刪除、修改

/================================================/

DAO → 由以下幾個部分組成:

Database Connection → 負責資料庫的開啟與關閉 (xxx.dbc.DatabaseConnection)
VO → 主要是屬性,setter、getter方法組成,與欄位相對應,每一個VO的組成都對應到一條記錄 (like JavaBean)
DAO → 定義操作的介面,新增、刪除、修改、按ID查詢等 (xxx.dao.ImplDAO)
Impl → DAO介面的真實實歸類別,完成實際的資料庫操作不負責開啟和關閉(xxx.dao.xxxImplDAO)
Proxy →  代理實現類別,完成資料庫的開啟和關閉 (xxx.dao.xxxDAOProxy)
Factory → 工廠類別,透過他取得一個DAO產生的實體物件 (xxx.factor.DAOFactory)

/================================================/
組成: 註冊系統 --> 將資料存到架設好的mySQL建表
1. index.jsp、emp_list.jsp、insert_success.jsp
2. com.demo => DatabaseConnection.java、Emp.java、IEmpDAO.java、IEmpDAOImpl.java、EmpDAOProxy.java、DAOFactory.java
3. com.dome.dbc => DatabaseConnection.java、MySQLDatabaseConnection.java
##ReadMore##
//index.jsp

<%@ page language="java" import="java.util.*" import="java.sql.*" pageEncoding="UTF-8"%>


<!DOCTYPE HTML PUBLIC "-//W3C//DTD HTML 4.01 Transitional//EN">
<html>
  <head>
       
    <title>新增員工</title>
 
  </head>
  
  <body  bgcolor="silver">
    <center>
    <h2><font color="blue" size="7">【南臺科大-員工註冊系統】</h2></font>
    <form action="insert_success.jsp" method="post" >
     <font size="5">●員工編號:</font><input type="text" name="empno"><br>
     <font size="5">●員工姓名:</font><input type="text" name="ename"><br>
  <font size="5">●員工職位:</font><input type="text" name="job"><br>
  <font size="5">●到職日期:</font><input type="text" name="hiredate"><br>
  <font size="5">●基本薪資:</font><input type="text" name="sal"><br>
  <input type="submit" value="註冊">
  <input type="reset" value="重設">
    </form>
    </center>
  </body>
</html>

//insert_success.jsp
<%@ page language="java" import="java.util.*" import="java.util.Date" import="java.sql.*" pageEncoding="UTF-8"%>
<%@ page import="com.demo.*" %>
<%@ page import="java.text.*" %>

<!DOCTYPE HTML PUBLIC "-//W3C//DTD HTML 4.01 Transitional//EN">
<html>
  <head>
    
    <title>My JSP 'insert_success.jsp' starting page</title>
    
  </head>
  <% request.setCharacterEncoding("UTF-8"); %>
  <body>
<%
 Emp emp=new Emp();
 emp.setEmpno(Integer.parseInt(request.getParameter("empno")));
 emp.setEname(request.getParameter("ename"));
 emp.setJob(request.getParameter("job"));
 emp.setHiredate(new SimpleDateFormat("yyyy-MM-dd").parse(request.getParameter("hiredate")));
 emp.setSal(Float.parseFloat(request.getParameter("sal")));
 try{
  if(DAOFactory.getIEmpDAOInstance().doCreate(emp)){
%>
  <h3>新增成功</h3>
<%
  }else{
%>
  <h3>新增失敗</h3>
<%
  }
%>
<%
 }catch(Exception e){
  e.printStackTrace();
 }
%>
  </body>
</html>

//emp_list.jsp
<%@ page language="java" import="java.util.*" pageEncoding="BIG5"%>
<%@ page import="java.util.*,com.demo.*"%>

<!DOCTYPE HTML PUBLIC "-//W3C//DTD HTML 4.01 Transitional//EN">
<html>
  <head>
    
    
    <title>My JSP 'emp_list.jsp' starting page</title>
    

  </head>
 <%
 request.setCharacterEncoding("UTF-8");
%>
<body>
 <%
  try {
   String keyword = request.getParameter("kw");//接收查詢關鍵字
   if (keyword == null) {//判斷是否有傳遞參數
    keyword = ""; // 如果沒有查詢關鍵字,則查詢全部
   }
   List<Emp> all = DAOFactory.getIEmpDAOInstance().findAll(keyword);
   Iterator<Emp> iter = all.iterator();//產生實體Iterator物件
 %>
 <center>
  <form action="emp_list.jsp" method="post">
   請輸入查詢關鍵字:<input type="text" name="kw"> <input type="submit"
    value="查詢">
  </form>
  <table border="1" width="80%">
   <tr>
    <td>僱員編號</td>
    <td>僱員姓名</td>
    <td>僱員工作</td>
    <td>僱傭日期</td>
    <td>基本薪水</td>
   </tr>
   <%
    while (iter.hasNext()) {
      Emp emp = iter.next();
   %>
   <tr>
    <td><%=emp.getEmpno()%></td>
    <td><%=emp.getEname()%></td>
    <td><%=emp.getJob()%></td>
    <td><%=emp.getHiredate()%></td>
    <td><%=emp.getSal()%></td>
   </tr>
   <%
    }
   %>
  </table>
 </center>
 <%
  } catch (Exception e) {
   e.printStackTrace();
  }
 %>
</body>
</html>

//DatabaseConnection.java
package com.demo;

import java.sql.Connection;
import java.sql.DriverManager;

public class DatabaseConnection {
 public static final String DBDRIVER="com.mysql.jdbc.Driver"; 
 public static final String DBURL="jdbc:mysql://localhost:3306/people"; 
 public static final String DBUSER="root"; 
 public static final String DBPASSWORD="abc123";
 private Connection conn;
 public DatabaseConnection()throws Exception{
  Class.forName(DBDRIVER);
  this.conn=DriverManager.getConnection(DBURL, DBUSER, DBPASSWORD);
 }
 public Connection getConn(){
  return this.conn;
 }
 public void close() throws Exception{
  if(this.conn!=null){
   try{
    this.conn.close();
   }catch(Exception e){
    throw e;
   }
  }
 }
 
 
}

//Emp.java
package com.demo;

import java.util.Date;

public class Emp {
 private int empno;
 private String ename;
 private String job;
 private Date hiredate;
 private float sal;
 public int getEmpno() {
  return empno;
 }
 public void setEmpno(int empno) {
  this.empno = empno;
 }
 public String getEname() {
  return ename;
 }
 public void setEname(String ename) {
  this.ename = ename;
 }
 public String getJob() {
  return job;
 }
 public void setJob(String job) {
  this.job = job;
 }
 public Date getHiredate() {
  return hiredate;
 }
 public void setHiredate(Date hiredate) {
  this.hiredate = hiredate;
 }
 public float getSal() {
  return sal;
 }
 public void setSal(float sal) {
  this.sal = sal;
 }
 
}

//IEmpDAO.java
package com.demo;

import java.util.List;

//IEmpDAO.java
//定義DAO操作標準
public interface IEmpDAO {
//doCreate主要執行資料庫的插入操作,操作時要傳入一個Emp物件
 public boolean doCreate(Emp emp)throws Exception;
  //emp增加的資料物件
  //return是否成功
 //findAll主要完成資料的查詢操作,因為是查詢的結果,所以使用List傳回
 public List findAll(String keyword)throws Exception;
  //keyword 查詢關鍵字
  //return傳回查詢結果,每一個Emp是一筆記錄
 //findById根據員工編號傳回一個Emp物件,其包含一個完整的資料資訊
 public Emp findById(int empno)throws Exception;
  //empno員工編號
  //return員工的VO物件
 /*
  doCreate()方法執行資料庫插入的操作,執行插入時要傳入一個Emp物件,此物件中有要資加的員工資訊
  findAll()主要完成資料的查詢,因為傳回的是多條查詢資訊,所以用List傳回,findById()主要是將Emp
    物件的編號傳回。
 */
}

//IEmpDAOImpl.java

package com.demo;

import java.sql.Connection;
import java.sql.PreparedStatement;
import java.sql.ResultSet;
import java.util.ArrayList;
import java.util.List;

public class IEmpDAOImpl implements IEmpDAO{
 private Connection conn=null;
 private PreparedStatement pstmt=null;
 public IEmpDAOImpl(Connection conn){
  this.conn=conn;
 }
 public boolean doCreate(Emp emp) throws Exception {
  // TODO Auto-generated method stub
  boolean flag=false;
  String sql="INSERT INTO emp(empno, ename, job, hiredate, sal) VALUES (?,?,?,?,?)";
  this.pstmt=this.conn.prepareStatement(sql);
  this.pstmt.setInt(1,emp.getEmpno());
  this.pstmt.setString(2,emp.getEname());
  this.pstmt.setString(3,emp.getJob());
  this.pstmt.setDate(4,new java.sql.Date(emp.getHiredate().getTime()));
  this.pstmt.setFloat(5,emp.getSal());
  if(this.pstmt.executeUpdate() > 0){
   flag=true;
  }
  this.pstmt.close();
  return flag;
 }

 public List findAll(String keyword) throws Exception {
  // TODO Auto-generated method stub
  //定義和接收全部的資料
  Listall=new ArrayList();
  String sql="SELECT empno, ename, job, hiredate, sal FROM emp WHERE ename LIKE ? or job LIKE ?";
  this.pstmt=this.conn.prepareStatement(sql);
  this.pstmt.setString(1,"%"+keyword+"%");
  this.pstmt.setString(2,"%"+keyword+"%");
  ResultSet rs=this.pstmt.executeQuery();
  Emp emp=null;
  while(rs.next()){
   emp=new Emp();
   emp.setEmpno(rs.getInt(1));
   emp.setEname(rs.getString(2));
   emp.setJob(rs.getString(3));
   emp.setHiredate(rs.getDate(4));
   emp.setSal(rs.getFloat(5));
   all.add(emp);//向集合中增加物件
  }
  this.pstmt.close();
  return all;//傳回所有集合的結果
 }

 public Emp findById(int empno) throws Exception {
  // TODO Auto-generated method stub
  Emp emp=null;
  String sql="SELECT empno, ename, job, hiredate, sal FROM emp WHERE empno=?";
  this.pstmt=this.conn.prepareStatement(sql);
  this.pstmt.setInt(1,empno);
  ResultSet rs=this.pstmt.executeQuery();
  if(rs.next()){
   emp=new Emp();
   emp.setEmpno(rs.getInt(1));
   emp.setEname(rs.getString(2));
   emp.setJob(rs.getString(3));
   emp.setHiredate(rs.getDate(4));
   emp.setSal(rs.getFloat(5));
  }
  this.pstmt.close();
  return emp;//如果查詢不到結果則傳回null,預設為null
 }
 
}

//EmpDAOProxy.java

package com.demo;

import java.util.List;

public class EmpDAOProxy implements IEmpDAO{
 private DatabaseConnection dbc=null;
 private IEmpDAO dao=null;
 public EmpDAOProxy()throws Exception{
  this.dbc=new DatabaseConnection();
  this.dao=new IEmpDAOImpl(this.dbc.getConn());
 }
 public boolean doCreate(Emp emp) throws Exception {
  // TODO Auto-generated method stub
  boolean flag=false;
  try{
   if(this.dao.findById(emp.getEmpno())==null){
    flag=this.dao.doCreate(emp);
   }
  }catch(Exception e){
   throw e;
  }
  finally{
   this.dbc.close();
  }
  return flag;
 }

 public List findAll(String keyword) throws Exception {
  // TODO Auto-generated method stub
  List all=null;
  try{
   all=this.dao.findAll(keyword);
  }catch(Exception e){
   throw e;
  }
  finally{
   this.dbc.close();
  }
  return all;
 }

 public Emp findById(int empno) throws Exception {
  // TODO Auto-generated method stub
  Emp emp=null;
  try{
   emp=this.dao.findById(empno);
  }catch(Exception e){
   throw e;
  }finally{
   this.dbc.close();
  }
  return emp;
 }

}

//DatabaseConnection.java

package com.demo.dbc;

import java.sql.Connection;

public interface DatabaseConnection {
 public Connection getConnection();
 public void close(); 
}

//MySQLDatabaseConnection.java

package com.demo.dbc;

import java.sql.Connection;

public class MySQLDatabaseConnection implements DatabaseConnection {

 public void close() {
  // TODO Auto-generated method stub
  
 }

 public Connection getConnection() {
  // TODO Auto-generated method stub
  return null;
 }
 
}

執行結果:
首頁
註冊

執行emp_list.jsp
到資料庫查看

在 Google Blogger 加入可控式「繼續閱讀(Read More)」功能

「繼續閱讀」之功能,在 Blogger 中又叫作 Jump Break ,其主要原理是讓 Blogger 不載入文章或是隱藏文章(只顯示摘要或標題),達到頁面載入速度加快及提升閱讀便利性。大致又區分成兩種方式來達成:

  1. Direct Link(超連結):真正的「不載入」文章,並以 Read More 將讀者引導至單篇文章的超連結頁面,有效大幅提升 Blogger 載入速度。但缺點是從讀者角度閱讀時,點選 Read More 會跳至超連結而整頁刷新。
  2. Collapsible(折疊收合):全部文章載入後「隱藏」起來,會稍微是升 Blogger 載入速度,點選 Read More 以「展開/收合」的方式提供閱讀,還可以加入動畫效果(滑動、淡入淡出)。雖然犧牲網頁載入速度,但從讀者角度,這種閱讀方式較為舒適。

本 Blogger 選用 Collapsible 的方式,過程參考「[BLOGGER]繼續閱讀懶人加強版 最新版本 v2.2.1(2009.5.8)」之文章,並實作成功。

於本站之用法:在文章(撰寫或 HTML 下都可以)中加入特殊字串則會在該處設定「Read More」,末設定則只顯示前 3 行,其餘隱藏,設定的符號為(注意大小寫):

##ReadMore##


後續介紹本站之設定方式:

Step1.
Blogger 「設計」→「範本」→「編輯HTML」→
找到 <head>...</head>,於 <head> 後方加入下碼:
(橙色字部份為建議修改及試玩的部份)


Step2.
參考文章「[BLOGGER]繼續閱讀懶人加強版 - [版本2.x]參數設定說明」進行參數微調,配合自己的需求。

Step3.
完成設定後,於文章內文中加入特殊標記做為繼續閱讀的分隔線,後面內容會自動收合。

Reference:


2015年12月21日 星期一

JAVA SL-314_12/13

JAVA SL-314_12/13

Date: 12/13

/======================================================/

<jsp:useBean>
與 import 功能相同
<jsp:useBean id=”產生的實體物件” scope="儲存範圍" class=”套件.class name” />

※ scope => 表示這個物件的儲存範圍,一共有四個屬性: page, request, session, application

/======================================================/

<jsp: setProerty>
可以透過 * 的形式完成屬性的自動設定
一其有4種方法

自動比對: <jsp: setProperty name=”實體的名稱(id)” property=”*” />
指定屬性: <jsp: setProperty name=”實體的名稱(id)” property=”屬性明稱” />
指定參數: <jsp: setProperty name=”實體的名稱(id)” property=”屬性明稱” param=”參數名稱” />
指定內容: <jsp: setProperty name=”實體的名稱(id)” property=”屬性明稱” value=”內容” />

/======================================================/

##ReadMore##

練習JavaBean --> demo_01.jsp、demo_02.jsp、SimpleBean.java

//demo_01.jsp
<%@ page language="java" import="java.util.*" pageEncoding="BIG5"%>
<%@ page import="com.*"%>

<!DOCTYPE HTML PUBLIC "-//W3C//DTD HTML 4.01 Transitional//EN">
<html>
  <head>
    
  </head>
  
  <body>
<%
 SimpleBean simple=new SimpleBean();
 simple.setName("聯成電腦");
 simple.setAge(30);
%>
 <h3>姓名:<%=simple.getName()%></h3>
 <h3>年齡:<%=simple.getAge()%></h3>
  </body>
</html>

//demo_02.jsp
<%@ page language="java" import="java.util.*" pageEncoding="BIG5"%>
<jsp:useBean id="simple" scope="page" class="com.SimpleBean"></jsp:useBean>

<!DOCTYPE HTML PUBLIC "-//W3C//DTD HTML 4.01 Transitional//EN">
<html>
  <head>
   
  </head>
  
  <body>

<%
 simple.setName("Aaron");
 simple.setAge(25);
%>
 <h3>姓名:<%=simple.getName()%></h3>
 <h3>年齡:<%=simple.getAge()%></h3>
  </body>
</html>

//SimpleBean.java
package com;

public class SimpleBean {
 private String name;
 private int age;
 public String getName() {
  return name;
 }
 public void setName(String name) {
  this.name = name;
 }
 public int getAge() {
  return age;
 }
 public void setAge(int age) {
  this.age = age;
 }

}
/======================================================/
接著練習透過JavaBean來驗證所輸入的資料是否符合所設定的範圍值:
index.jsp       --> 首頁輸入介面
Register.java --> JavaBean(條件)
check.jsp       --> 審核是否符合,不符合就是顯示回首頁,符合就是顯示成功頁面
success.jsp    --> 顯示所輸入的正確資料頁面

//index.jsp
<%@ page language="java" import="java.util.*" pageEncoding="BIG5"%>
<jsp:useBean id="reg" scope="request" class="com.Register" />

<!DOCTYPE HTML PUBLIC "-//W3C//DTD HTML 4.01 Transitional//EN">
<html>
  <head>
    

  </head>
  
  <body>
   
    <form action="check.jsp" method="post">
    <center>
     使用者名稱:<input type="text" name="name" value="<jsp:getProperty name="reg" property="name"/>"/><%=reg.getErrorMsg("errname")%><br>
  年齡:<input type="text" name="age" value="<jsp:getProperty name="reg" property="age"/>"/><%=reg.getErrorMsg("errage")%><br>
  E-mail:<input type="text" name="email" value="<jsp:getProperty name="reg" property="email"/>"/><%=reg.getErrorMsg("erremail")%><br>
  <input type="submit" value="註冊">
  <input type="reset" value="重設">
 </center>
 </form>
 
  </body>
</html>

//Register.java
package com;

import java.util.HashMap;
import java.util.Map;

public class Register {
 private String name;
 private String age;
 private String email;
 public String getName() {
  return name;
 }
 public void setName(String name) {
  this.name = name;
 }
 public String getAge() {
  return age;
 }
 public void setAge(String age) {
  this.age = age;
 }
 public String getEmail() {
  return email;
 }
 public void setEmail(String email) {
  this.email = email;
 }
 
 private Map errors=null;
 public  Register(){
  this.name="";
  this.age="";
  this.email="";
  this.errors=new HashMap();
  
 }
 public String getErrorMsg(String key){
  String value=this.errors.get(key);
  return (value==null) ? "" : value;
 }
 public boolean isValidate(){
  boolean flage=true;
  if(!this.name.matches("\\w{6,15}")){
   flage=false;
   this.name=""; //清空原本的內容
   this.errors.put("errname", "請重新輸入6~15字名稱");
  }
  
  if(!this.age.matches("\\d+")){
   flage=false;
   this.age="";
   this.errors.put("errage", "請重新輸入正確數字年齡");
  }
  
  if(!this.email.matches("\\w+@\\w+\\.\\w+\\.?\\w*")){
   flage=false;
   this.email="";
   this.errors.put("erremail", "請重新輸入正確E-Mail");
  }
  return flage;
 }
}

//check.jsp
<%@ page language="java" import="java.util.*" pageEncoding="BIG5"%>
<jsp:useBean id="reg" scope="request" class="com.Register" />
<jsp:setProperty name="reg" property="*" />

<!DOCTYPE HTML PUBLIC "-//W3C//DTD HTML 4.01 Transitional//EN">
<html>
  <head>
     
    <title>My JSP 'check.jsp' starting page</title>

  </head>
  
  <body>
<%
 if(reg.isValidate()){ //對所輸入的內容進行檢查
%>
 <jsp:forward page="success.jsp"/>
<%
 }else{
%>
 <jsp:forward page="index.jsp"/>
<%
 }
%>
  </body>
</html>

//success.jsp
<%@ page language="java" import="java.util.*" pageEncoding="BIG5"%>
<jsp:useBean id="reg" scope="request" class="com.Register" />
<!DOCTYPE HTML PUBLIC "-//W3C//DTD HTML 4.01 Transitional//EN">
<html>
  <head>
   
    <title>My JSP 'success.jsp' starting page</title> 

  </head>
  
  <body>
   <center>
     使用者名稱:<jsp:getProperty name="reg" property="name" /><br>
     年齡:<jsp:getProperty name="reg" property="age" /><br>
     E-mail:<jsp:getProperty name="reg" property="email" />
    </center>
  </body>
</html>
/======================================================/
練習
//input.jsp
<%@ page language="java" import="java.util.*" pageEncoding="BIG5"%>


<!DOCTYPE HTML PUBLIC "-//W3C//DTD HTML 4.01 Transitional//EN">
<html>
  <head>
        
    <title>My JSP 'input.jsp' starting page</title>
    
  </head>
  
  <body>
   
     姓名:<input type="text" name="name" >
  年齡:<input type="text" name="age" ><br>
  <input type="submit" value="傳送">
  <input type="reset" value="重置">
  </body>
</html>

//input_bean.jsp
<%@ page language="java" import="java.util.*" pageEncoding="BIG5"%>
<jsp:useBean id="simple" scope="page" class="com.SimpleBean" />
<jsp:setProperty name="simple" property="name" param="name" />
<jsp:setProperty name="simple" property="age" param="age" />
<!DOCTYPE HTML PUBLIC "-//W3C//DTD HTML 4.01 Transitional//EN">
<html>
  <head>
       
    <title>My JSP 'input_bean.jsp' starting page</title>

  </head>
  
  <body>
   <center>
   
   <% 
    simple.setName("aaa");
    simple.setAge(12);
   %>
   <h3>姓名:<%=simple.getName()%></h3>
   <h3>年齡:<%=simple.getAge()%></h3>
 
   </center>
  </body>
</html>

在 Google Blogger 中建立返回頁首之按鍵

返回頁首(Back to Top),可以結合本站文章「在 Google Blogger 中建立下拉式選單」,可以提供高效率閱灠環境,例如下列閱灠流程:
  • 點選 MenuBar。
  • 尋找文章。
  • 閱讀文章(由上至下)。
  • 返回頁首之按鍵(快速回到 MenuBar 找尋其他文章)。
本文使用 scrollUp jQuery Plugin 來達到功能,當頁面離開下拉式選單一定距離後,會自動浮現「返回頁首」鍵。

##ReadMore##

Step1.
至 scrollUp jQuery Plugin 網站下載 scrollup-master.zip 之套件,並解壓縮之。

Step2.
參考文章「以 Google Drive 分享超連結供 Blogger 使用」,至解壓縮後的目錄之路徑:scrollup-master/dist/,將其中的 jquery.scrollUp.min.js 上傳至網路空間並取得其網址。

Step3.
上傳自己喜歡的圖示(建議 48×48 .icon 檔) 或是至解壓縮後的目錄之路徑:scrollup-master/demo/img/,將 top.png 上傳至網路空間並取得其網址。

Step4.
至 Blogger 「設計」→「範本」→「編輯HTML」→
找到 <head>...</head> ,直接在 <head> 後方加入下 Code:
<!-- scrollUp jQuery Plugin START -->
    <script src='//ajax.googleapis.com/ajax/libs/jquery/1.10.2/jquery.min.js'/>
    <!-- scrollUp jQuery plugin -->
    <script src='https://googledrive.com/host/0BxEiZ5gd9umbd09LMENDcGh1NXc' type='text/javascript'/>

    <script>
    $(function () {
      $.scrollUp({
        scrollImg: true // Set true to use image
      });
    });
    </script>
<!-- scrollUp jQuery Plugin END -->
其中,第 4 行之 src=... 請改成 Step2. 檔案 jquery.scrollUp.min.js 網址

Step5.
至 Blogger 「設計」→「範本」→「編輯HTML」→
找到<b:skin>...</b:skin>,直接在 ]]></b:skin> 前方加入下 Code:
/********** scrollUp jQuery Plugin START **********/
#scrollUp {
  bottom: 20px;
  right: 20px;
  height: 64px;  /* Height of image */
  width: 64px; /* Width of image */
  background: url(https://googledrive.com/host/0BxEiZ5gd9umba1haeG5oY2d1OTQ) no-repeat;
}
/********** scrollUp jQuery Plugin END **********/
其中,第 7 行之 url(...) 請改成 Step3. 之圖示網址


以 Google Drive 分享超連結供 Blogger 使用

在文章清單 Blog Usage 中,有許多篇提到需要修改範本之設定,常用到的程式語法有:HTML、JavaScript、CSS,其中又常常需要用到網頁空間來做超連結之用途。

本文作法參考「使用 Google 雲端硬碟(Drive)放置 Blogger 部落格使用的 CSS 與 JavaScript 檔案」之說明利用 Google Drive 資源實作成功,並提出優缺點分析。

Google Drive 優點:
  • 免費,且辦帳號很容易。
  • 容量大,可達 15 GB 以上。
  • 穩定,無流量限制,且 Google 大廠不怕倒。
Google Drive 缺點:
  • 很慢,用於 Blogger 時會明顯影響頁面載入速度。

##ReadMore##

Step1.
上傳檔案或整個目錄至 Google Drive。

Step2.
點選要共享的檔案或目錄→右鍵→共享→進階→「特定使用者才能存取」變更…→「開啟-公開在網路上」。

Step3.
點選要共享的檔案或目錄→右鍵→取得連結→複製。

此時會得到一個連結,但開啟卻發現是 Google 雲端的頁面,這不是我們要的,舉例:
https://drive.google.com/open?id=0BxEiZ5gd9umbclRrOEZhU05tQmM

請截取後段的 ID 碼:
0BxEiZ5gd9umbclRrOEZhU05tQmM

Step4.
承上步驟,在 ID 碼前面再加入
https://googledrive.com/host/

完成結果如下:
https://googledrive.com/host/0BxEiZ5gd9umbclRrOEZhU05tQmM

該連結就可以成功只得到所共享的檔案資料之內容,即可放上網頁程式之應用。
---
Reference:
使用 Google 雲端硬碟(Drive)放置 Blogger 部落格使用的 CSS 與 JavaScript 檔案

2015年12月20日 星期日

JAVA SL-314_12/06

Date: 12/06

/========================================================/
session物件

session的用處就是完成使用者的login logout
等常見功能,每一個session都表示不同的存取
使用者,其為javax.servlet.http.HttpSesion介面
所產生的實體物件

HttpSession介面中存在以下4種屬性操作方法:
1. 設定屬性 public void patValue(String name, Object value)
2. 取得屬性 public Object getValue(String name)
3. 刪除屬性 public void removeValue(String name)
4. 取得全部性屬性名稱 public String[ ] getValueNames()
/========================================================/
※ 作業系統伺服器+web伺服器(mysql+tomcat)
web伺服器是用來解譯web程式語言

※ JSP是一個很嚴謹的程式語言,因此相對的比較不容易被駭客入侵。
/========================================================/
取得session Id

當一個使用者連到web伺服器,伺服器就會
分配一個不重複的session id ,利用此id來
區別使用者,可利用HttpSession 下的 getId()
來取得id
<body>
<%
String id=session.getId();
%>
<h3>ID是:<%=id%></h3>
<h3>ID長度是:<%=id.length()%></h3>
</body>
/========================================================/
判斷是否為新增使用者
在session 物件中可以利用isNew()來判斷是否為新的使用者
<body>
<%
if(session.isNew()){
%>
<h3>Welcome ! ! New friend ~ </h3>
<%
}else{
%>
<h3>You are Old user ~~</h3>
<%
        }
%>
/=====================================================/
取得使用者的操作時間

透過getCreationTime()取得一個session時間,也可以透過getLastAccessedTime()
取得session最後的操作時間
<body>
<%
long start=session.getCreationTime();
long end=session.getLastAccessedTime();
long time=(end-start)/1000;
%>
<h3>你已經停留了.....<%=time%>秒</h3>

/========================================================/
application物件

javax.servlet.ServletContext介面的物件
常用的方法
public String getRealPath(String path)   虛擬目錄對應的絕對路徑
public Enumeration getAttribateNames()   取得所有屬性名稱
public String getContextPath()  取得虛擬路徑的名稱

/========================================================/
application取得

<%
String path=application.getRealPath(“/”);
%>
<h3>真實路徑: <%=path%>
//也可以利用getServletContext()方法代替
<%
String path1=this.getServletContext().getRealPath(“/”);
%>
<h3>真實路徑:<%=path1%></h3>

/========================================================/
JavaBean

其用意是當JSP需要呼叫使用時,就可以直接使用,不需要再重複撰寫規則

1. 所有的類別都必須放在一個package中
2. 所有的類別都需要宣告public class,這樣才能讓外部進行存取
3. 類別中所有的屬性都必須封裝,所以都是private
4. 在屬性進行存取時,皆須利用getter(),setter()等方法
/========================================================/
語法:
<jsp: useBean指令>

<jsp: useBean id=”實體物件name” scope=”儲存範圍” class=”類別 package名稱”;>
/========================================================/
//session.jsp
<%@ page language="java" import="java.util.*" pageEncoding="BIG5"%>

<!DOCTYPE HTML PUBLIC "-//W3C//DTD HTML 4.01 Transitional//EN">
<html>
  <head>  

  </head>
  
  <body>
<%
 String id=session.getId();
%>
 <h3>ID是:<%=id%></h3>
 <h3>ID長度是:<%=id.length()%></h3>
  </body>
</html>

//session_01.jsp
<%@ page language="java" import="java.util.*" pageEncoding="BIG5"%>

<!DOCTYPE HTML PUBLIC "-//W3C//DTD HTML 4.01 Transitional//EN">
<html>
  <head>

  </head>
  <body>
<%
 if(session.isNew()){
%>
  <h3>Welcome ! ! New friend ~ </h3>
<%
 }else{
%>
 <h3>You are Old user ~~</h3>
<% 
 }
%>
    
  </body>
</html>

//session_time.jsp
<%@ page language="java" import="java.util.*" pageEncoding="BIG5"%>

<!DOCTYPE HTML PUBLIC "-//W3C//DTD HTML 4.01 Transitional//EN">
<html>
  <head> 

  </head>
  
  <body>
<%
 long start=session.getCreationTime();
 long end=session.getLastAccessedTime();
 long time=(end-start)/1000;
%>
 <h3>你已經停留了.....<%=time%>秒</h3>
   
  </body>
</html>

//session_application_get.jsp
<%@ page language="java" import="java.util.*" pageEncoding="BIG5"%>

<!DOCTYPE HTML PUBLIC "-//W3C//DTD HTML 4.01 Transitional//EN">
<html>
  <head>

  </head>
  
  <body>
<%
 String path=application.getRealPath("/");
%>
<h3>真實路徑: <%=path%>
<!--也可以利用getServletContext()方法代替-->
<%
 String path1=this.getServletContext().getRealPath("/");
%>
<h3>真實路徑:<%=path1%></h3>    
  </body>
</html>
/========================================================/
執行先前裝好的MySQL

如果沒有mldn資料庫,請執行以下指令:
mysql> create Database mldn;
再來執行:
mysql> use mldn;
mysql> CREATE TABLE emp{
    -> empno  int<4>  PRIMARY  KEY,
    -> ename  VARCHAR<10>,
    -> job    VARCHAR<10>,
    -> hire   DATE,
    -> sal    FLOAT<7>};
結果如下圖
也可以開請瀏覽器執行 localhost/phpMyAdmin/index.php 從中建立表單
接著將以下指令貼到SQL裡面並執行
INSERT INTO emp (empno,ename,job,hire,sal) VALUES (6060,'李興華','經理','2001-09-16',2000.30) ;
INSERT INTO emp (empno,ename,job,hire,sal) VALUES (7369,'董鳴楠','銷售','2003-10-09',1500.90) ;
INSERT INTO emp (empno,ename,job,hire,sal) VALUES (8964,'李祺','分析員','2003-10-01',3000) ;
INSERT INTO emp (empno,ename,job,hire,sal) VALUES (7698,'張惠','銷售','2005-03-12',800) ;
INSERT INTO emp (empno,ename,job,hire,sal) VALUES (7782,'楊軍','分析員','2005-01-12',2500) ;
INSERT INTO emp (empno,ename,job,hire,sal) VALUES (7762,'劉明','銷售','2005-03-09',1000) ;
INSERT INTO emp (empno,ename,job,hire,sal) VALUES (7839,'王月','經理','2006-09-01',2500) ;
如下圖所示
驗證是否有將資料匯入資料庫 --> 瀏覽
command line 驗證如下圖,會有亂碼是因為資料庫字型的關係

Driver JARs: https://drive.google.com/file/d/0B8Dfp4n5Q35COTNVOUpiZHZvbnM/view?usp=sharing

//MyJsp01.jsp
<%@ page language="java" import="java.util.*" import="java.sql.*" pageEncoding="BIG5"%>


<%! 
 public static final String DBDRIVER="com.mysql.jdbc.Driver"; 
 public static final String DBURL="jdbc:mysql://localhost:3306/mldn"; 
 public static final String DBUSER="root"; 
 public static final String DBPASS="abc123"; 
%>
<%
 Connection conn=null;
 PreparedStatement ps=null;
 ResultSet rs=null;
%>
<%
 try{
  Class.forName(DBDRIVER);
  conn=DriverManager.getConnection(DBURL, DBUSER, DBPASS);
  String sql="SELECT empno,ename,job,hire,sal FROM emp";//表格名稱
  ps=conn.prepareStatement(sql);
  rs=ps.executeQuery(); 
%> 
r <% while(rs.next()){ int empno=rs.getInt(1); String ename=rs.getString(2); String job=rs.getString(3); java.util.Date date=rs.getDate(4); Float sal=rs.getFloat(5); %> <% } %>
員工編號 員工姓名 職務 雇用日期 薪資
<%=empno%> <%=ename%> <%=job%> <%=date%> <%=sal%>
<% }catch(Exception e){ e.printStackTrace(); }finally{ rs.close(); ps.close(); conn.close(); } %>
在瀏覽器執行後結果如下圖,他會去抓取資料庫的表單資料並匯出:
在 Google Blogger 中建立下拉式選單


簡介:
於 Blogger 標題正下方建立一列 MenuBar 下拉式選單,點選下拉選單之選項可以超連結至指定有效網址,可達成更便利的閱灠環境。

##ReadMore##
Step 0.
請先進行 Blogger 範本的備份,後續步驟會修改到 Blogger 的 HTML 及 CSS 內容。

Step 1.
「設計」→「範本」→「編輯 HTML 」→搜尋到 ]]></b:skin> ,在其上方加入下拉選單樣式的 CSS 程式:
/* ================== NAV MENU =================== */
/* MenuBar 下拉選單條整體外框設定 */
#navMenu {
 width: 1000px;
 height: 35px;
 margin: 0 auto 0;
 padding: 0;
 border-top: 1px solid #000000;
 border-bottom: 1px solid #000011;
 background:#222222 repeat-x top;
}

#navMenuleft {
 width: 1000px;
 float: left;
 margin: 0;
 padding: 0;
}

#nav {
 margin: 0;
 padding: 0;
}

#nav ul {
 float: left;
 list-style: none;
 margin: 0;
 padding: 0;
}

#nav li {
 list-style: none;
 margin: 0;
 padding: 0;
}

/* 主選單(最上層) Text 設定 */
#nav li a, #nav li a:link, #nav li a:visited {
 color: #aaaaaa;
 display: block;
 text-transform: capitalize;
 margin: 0;
 padding:8px 20px 8px;
 font: bold 15px Verdana, Arial;
}

/* 主選單(最上層)被選取時(selected)的設定 */
#nav li a:hover, #nav li a:active {
 background:#000000;
 color: #ff8800;
 margin: 0;
 text-decoration: none;
 padding:8px 20px 8px;
 font: bold 15px Verdana, Arial;
}

/* 子選單(第二層以後) 下拉選單外框設定 */
#nav li li a, #nav li li a:link, #nav li li a:visited {
 background:#222222 repeat-x top;
 width: 150px;
 color: #aaaaaa;
 //text-transform: lowercase;
 float: none;
 margin: 0;
 border-bottom: 1px solid #000000;
 border-left: 1px solid #000000;
 border-right: 1px solid #000000;
 padding: 7px 15px;
 font: normal 14px Verdana, Arial;
}

/* 子選單(第二層以後)被選取時(selected)的設定 */
#nav li li a:hover, #nav li li a:active {
 background: #000000;
 color: #ff8800;
 padding: 7px 15px;
 font: normal 14px Verdana, Arial;
}

#nav li {
 float: left;
 padding: 0;
}

#nav li ul {
 z-index: 9999;
 position: absolute;
 left: -999em;
 height: auto;
 width: 150px;
 margin: 0;
 padding: 0;
}

#nav li ul a {
 width: 150px;
}

#nav li ul ul {
 margin: -32px 0 0 180px;
}

#nav li:hover ul ul, #nav li:hover ul ul ul, #nav li.sfhover ul ul, #nav  li.sfhover ul ul ul {
 left: -999em;
}

#nav li:hover ul, #nav li li:hover ul, #nav li li li:hover ul, #nav li.sfhover ul, #nav li li.sfhover ul, #nav li li li.sfhover ul {
 left: auto;
}

#nav li:hover, #nav li.sfhover {
 position: static;
}

  • 其中,幾個常用的參數是可以進行修改以副合自己 Blogger 版本,例如:border(邊框)、width(寬)、height(長)、background(背底色)、color(文字顏色)、font(字型)、margin(邊緣外距離)、padding(邊緣內距離)。
  • 背景色也可以用 url(http://......) 加入圖片網址做成底圖。
  • 顏色色碼可參考「色 碼 表」之十六進制碼。


Step 2.
同樣「編輯HTML」搜尋「自己 Blogger 名稱」,如下圖位置:

在上圖的 </div> 下加入 HTML Code 新增下拉式選單語法:
<!-- 自訂義下拉式選單start -->
<div id='navMenu'>
<div id='navMenuleft'>
<ul id='nav'>

<li>
 <a expr:href='data:blog.homepageUrl'>Home</a>
</li>

<li>
 <a href='http://p501lab.blogspot.tw/p/about.html'>About</a>
</li>

<li>
 <a href='http://p501lab.blogspot.tw/p/3d.html'>3D</a>
<!--
 <ul>
  <li><a href='http://p501lab.blogspot.tw/p/3d-blender_19.html'>Blender</a></li>
  <li><a href='http://p501lab.blogspot.tw/p/3d-freecad.html'>FreeCAD</a></li>
  <li><a href='http://p501lab.blogspot.tw/p/3d-printer.html'>3D Printer</a></li>
   </ul>
-->
</li>

<li>
 <a href='http://p501lab.blogspot.tw/p/blog-usage_19.html'>Blog Usage</a>
</li>

<li>
 <a>Embedded Board</a>
 <ul>
  <li><a href='http://p501lab.blogspot.tw/p/embedded-boards-cubieboard.html'>Cubieboard</a></li>
  <li><a href='http://p501lab.blogspot.tw/p/embedded-boards-raspberry-pi.html'>Raspberry Pi</a></li>
  <li><a href='http://p501lab.blogspot.tw/p/embedded-board-unojoy.html'>UnoJoy</a></li>
 </ul>
</li>

<li>
 <a>Linux</a>
 <ul>
  <li><a href='http://p501lab.blogspot.tw/p/linux-centos.html'>CentOS</a></li>
  <li>
   <a href='http://p501lab.blogspot.tw/p/linux-debian_5.html'>Debian</a>
   <ul>
    <li><a href='http://p501lab.blogspot.tw/p/linux-debian-tools.html'>Tools 工具</a></li>
    <li><a href='http://p501lab.blogspot.tw/p/linux-debian.html'>基礎操作及運用</a></li>
    <li><a href='http://p501lab.blogspot.tw/p/linux-debian-embedded.html'>Embedded 課程</a></li>
    <li><a href='http://p501lab.blogspot.tw/p/linux-debian_35.html'>進階課程</a></li>
    <li><a href='http://p501lab.blogspot.tw/p/linux-debian_19.html'>進階其他</a></li>
    <li><a href='http://p501lab.blogspot.tw/p/linux-debian-laptop.html'>Laptop</a></li>
   </ul>
  </li>
  <li><a href='http://p501lab.blogspot.tw/p/linux-red-hat.html'>Red Hat</a></li>
 </ul>
</li>

<li>
 <a>Programs</a>
 <ul>
  <li><a href='http://p501lab.blogspot.tw/p/programs-android.html'>Android App</a></li>
  <li><a href='http://p501lab.blogspot.tw/p/programs-arduino.html'>Arduino</a></li>
  <li><a href='http://p501lab.blogspot.tw/p/programs-bash-shell.html'>Bash Shell</a></li>
  <li><a href='http://p501lab.blogspot.tw/p/programs-jsp.html'>JSP</a></li>
  <li><a href='http://p501lab.blogspot.tw/p/programs-java.html'>Java</a></li>
  <li><a href='http://p501lab.blogspot.tw/p/programs-latex.html'>LaTeX</a></li>
  <li><a href='http://p501lab.blogspot.tw/p/programs-python_19.html'>Python</a></li>
 </ul>
</li>

<li>
 <a>Windows</a>
 <ul>
  <li><a href='http://p501lab.blogspot.tw/p/windows-tools.html'>Tools</a></li>
 </ul>
</li>

</ul>


</div>
</div>
<!-- 自訂義下拉式選單end -->

---
簡易說明,下拉選單的語法架構為。
  • 最上層 MenuItem,用 <li>...</li> 包住的內容,如下:
<li>
 <a href='http://p501lab.blogspot.tw/p/blog-usage_19.html'>Blog Usage</a>
</li>

  • 其中 <li>...</li>,也可以去除超連結,如下:
<li>
 <a>Embedded Board</a>
</li>

  • 加入第二層以後 MenuItem,要用最上層的 <li>...</li> 語法外,再加入 <ul>...</ul>,並且再 ul 標籤內加入同前面敘述的 <li>...</li>的架構,如下:
<li>
 <a>Embedded Board</a>
 <ul>
  <li><a href='http://p501lab.blogspot.tw/p/embedded-boards-cubieboard.html'>Cubieboard</a></li>
  <li><a href='http://p501lab.blogspot.tw/p/embedded-boards-raspberry-pi.html'>Raspberry Pi</a></li>
  <li><a href='http://p501lab.blogspot.tw/p/embedded-board-unojoy.html'>UnoJoy</a></li>
 </ul>
</li>


---
Reference:
CSS∥排版觀念-BoxModel>Margin、Padding
凱特打結該該叫→[教學]在blogger建立下拉式導覽列