2015年10月20日 星期二

JAVA SL-275_10/18

常用的 Java 圖形 Lib (java 7.0 版以後,兩種可以混用):
AWT
Swing

一般功能表是由三種類別所建立:
MenuBar
Menu
MenuItem

java.lang.Object

java.awt.MenuComponent → java.awt.MenuBar
java.awt.MenuComponent → java.awt.MenuItem ─ java.awt.Menu
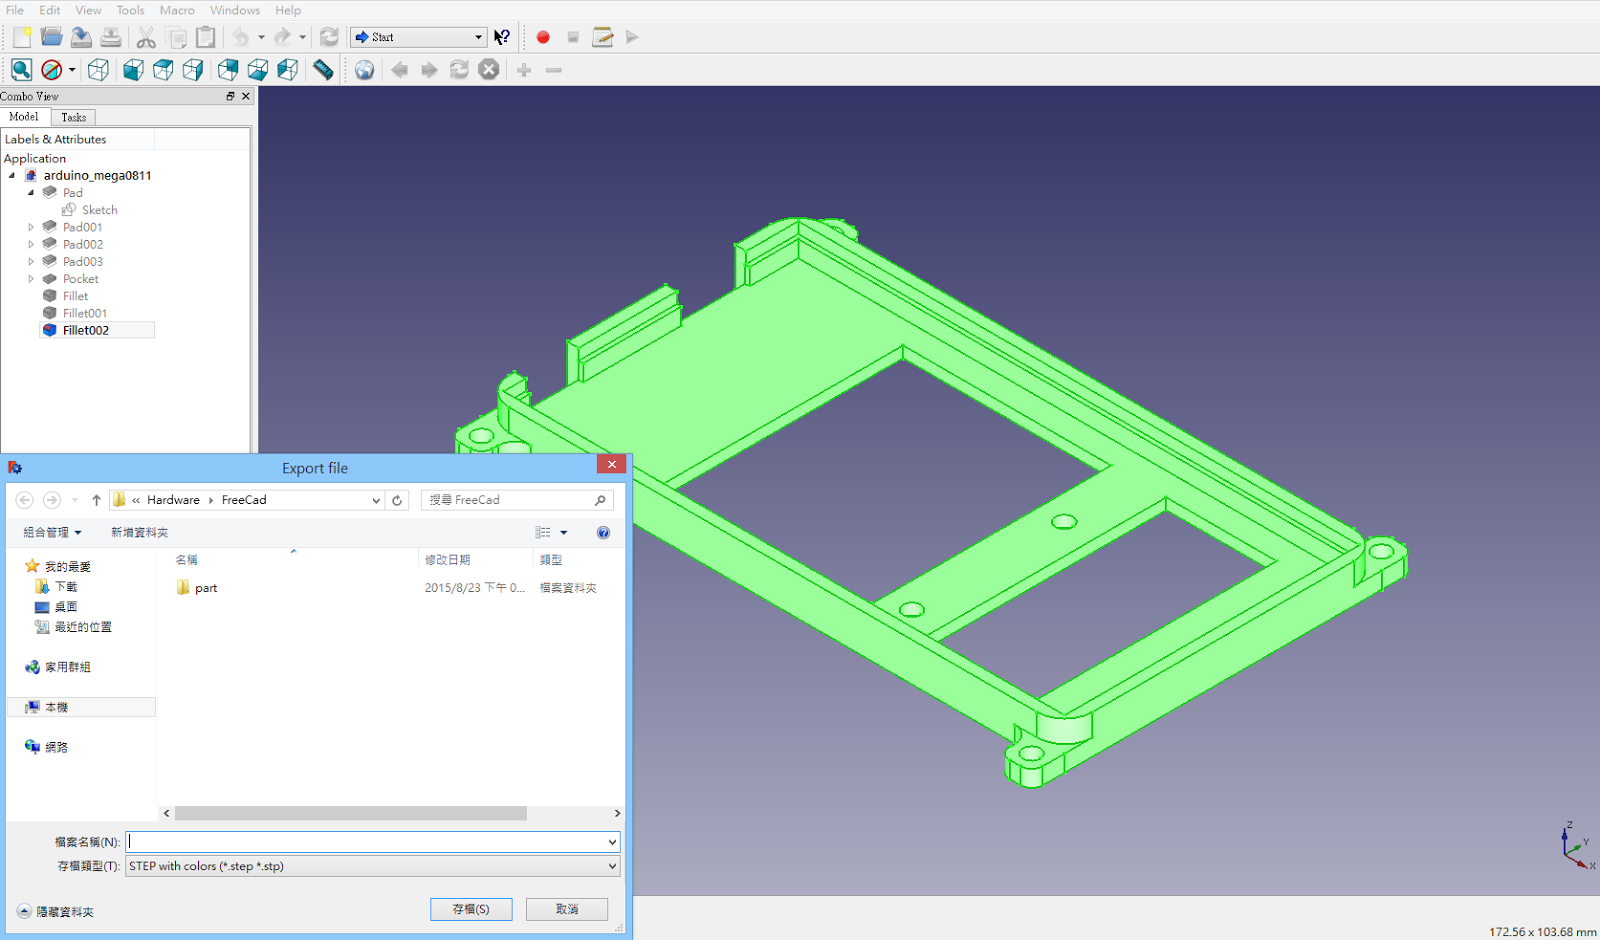

設計的參數及概念:


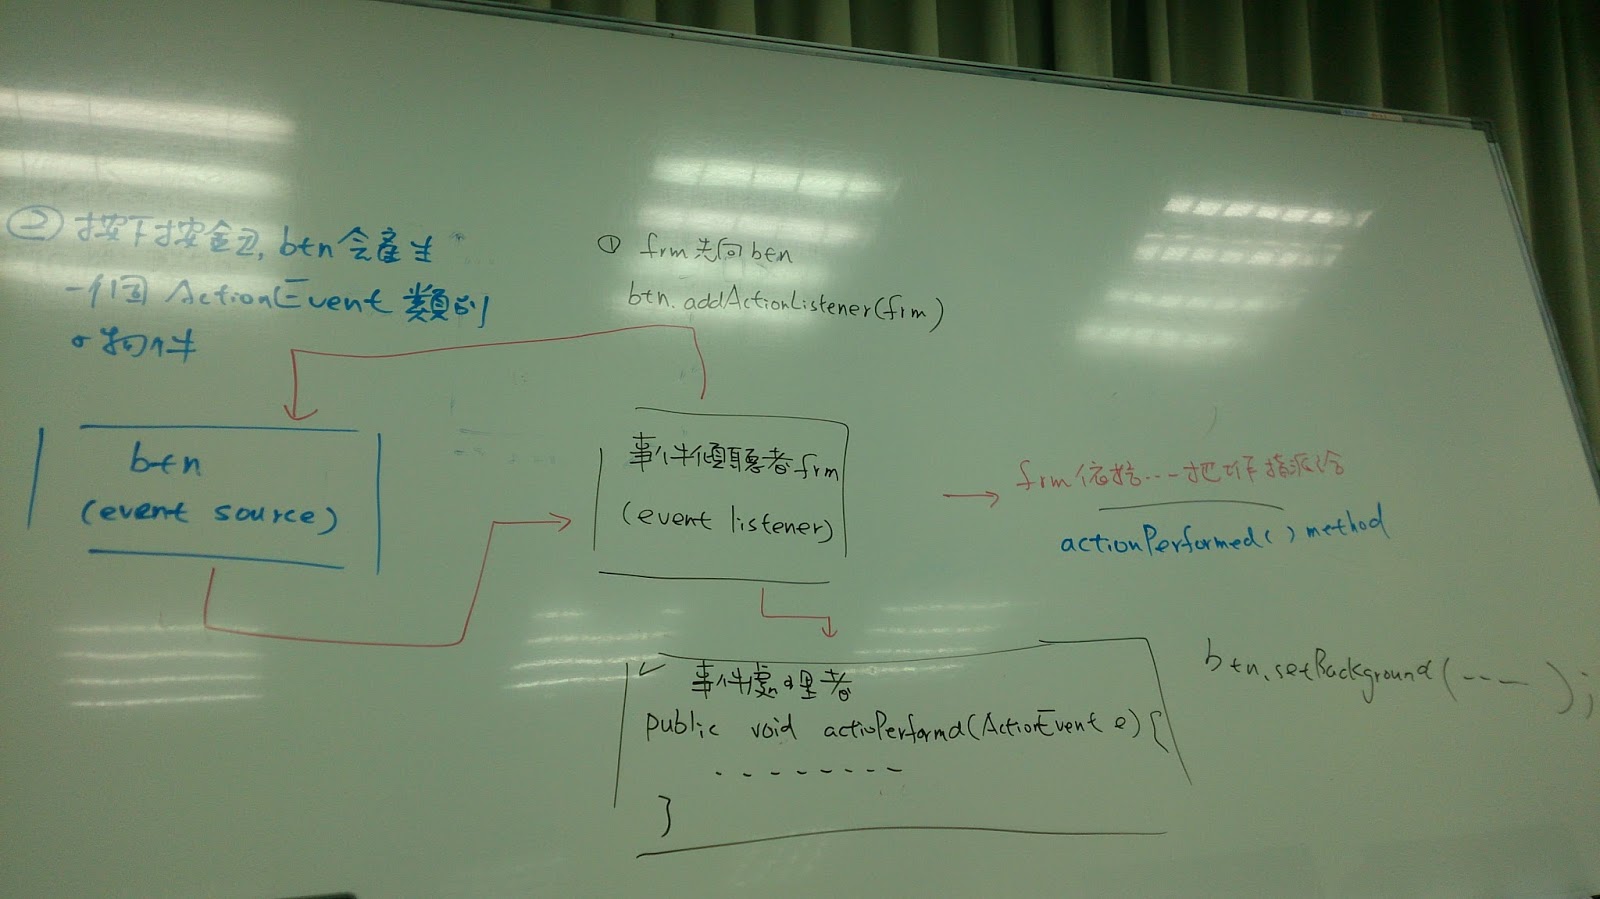
監聽事件 (event listener) 架構圖:


2015年10月16日 星期五

Roseapple PI - expand last usable sector with GPT and expand root partition without formatting

使用 gdisk 對 /dev/sdX

gdisk /dev/sdX

輸入 p 來看磁碟資訊

 p (print the partition table)

...
First usable sector is 34, last usable sector is 15523806
...

想要更改 last usable sector 的值到磁碟最後的磁區時

輸入 x 使用 gdisk 的額外功能

 x (extra functionality)

然後輸入 e 來自動更改 GPT 的 last usable sector

 e (relocate backup data structures to the end of the disk)

其輸出:

Relocating backup data structures to the end of the disk

這樣就完成更改 last usable sector .

輸入 w 來儲存變更

 w (write table to disk and exit)

---------------------------------------------------

接下來是 expand root partition

**在開始延伸之前必需先記住 root partition 的 Start sector 的位置**

一樣使用 gdisk 對 /dev/sdX

gdisk /dev/sdX

輸入 d 來刪除 root partition

 d (delete a partition)

再來輸入 n 來建立新的磁區

 n (add a new partition)

**接下來才是重點**

在輸入 First sector 的位置時

一定要輸入原本之前記住的 Start sector

這樣才會抓取完整的檔案格式(ext4)

完成後輸入 w 儲存離開.

The End

2015年10月15日 星期四

Raspberry Pi:安裝Apache、PHP、Mariadb


1.更新套件資訊
pi@raspberrypi ~ $ sudo apt-get update & sudo apt-get upgrade

2.安裝 Apache 、 PHP 、Mariadb
pi@raspberrypi ~ $ sudo apt-get install apache2 php5 libapache2-mod-php5 php5-mysql mariadb-server mariadb-client

3.測試是否安裝成功
修改 /etc/apache2/sites-enabled/000-default.conf
pi@raspberrypi ~ $ sudo /etc/apache2/sites-enabled/000-default.conf
DocumentRoot /var/www/

重啟 Apache
 pi@raspberrypi ~ $ sudo systemctl restart apache2.services

在 /var/www/ 目錄下 新增 index.php
 pi@raspberrypi ~ $ sudo vim /var/www/index.php
<?php
phpinfo();
?>

成功畫面如下:


Mariadb 成功畫面如下:


參考文獻:http://www.htpcguides.com/install-wordpress-on-raspberry-pi-with-raspbian/


2015年10月7日 星期三

Raspberry Pi GPIO (四) 使用 C 控制 LED

這是個簡單的範例,所以就沒有接上保護的電路,直接實作,但是
如果接錯線讓板子燒掉的話,請自行負責。

首先將 3.3V (pin 1) 接到 LED的正端,然後接上保護電阻 (220~1K)
最後接上 GPIO0 (pin 11)

打開終端機,用 pi 執行以下指令:

pi@raspberrypi ~ $ vim blink.c

#include <stdio.h>
#include < wiringPi.h>
#define    LED        0

int main (void)
{
        printf ("Raspberry pi blink\n") ;

        wiringPiSetup () ;
        pinMode (LED, OUTPUT) ;

        for (;;)
        {
        digitalWrite (LED, HIGH) ;   // On
        delay (500) ;            // mS
        digitalWrite (LED, LOW) ;    // Off
        delay (500) ;
        }
        return 0 ;
}
存檔後就可以執行以下指令來執行程式:
pi@raspberrypi ~ $ gcc -o blink blink.c –lwiringPi
pi@raspberrypi ~ $ sudo ./blink

實際影片:

https://youtu.be/Ei08Dl4VXys


參考文獻:http://wiringpi.com/examples/quick2wire-and-wiringpi/install-and-testing/

JAVA SL-275_10/04

‧List 
作用是收集物件,並以索引益式保留收集的物件順序。
‧ArrayList
在陣列中的排序使用可以得到較快的速度,
如果是需要調整索引順序時,則會有較差的表現。

.LinkedList
在實作 List 介面時,採用了 (Link) 結構。
first > Object > Object > Object
next next next
Node Node Node
如果要指定索引隨機存取物件時,不建議用 LinkedList,其每次存取都會從頭 (first ) 開始,
但若只是調整索引順序,從還是可以使用 LinkedList。
//------------------------------------------------------------------------------------------------
支援佇列操作的 Queue
繼承自 Collection,所以它也具有 Collection 的 add(), remove(), element() 等方法。
一操作失敗時,會拋出例外

Queue 定義了自己的 offer(), poll(), pee,() 等方法。
一操作失敗時會傳回特定值

offer() 用來在佇列後端加入物件
成功→True, 失敗→false

poll() 取出佇列前端物件,若佇列為空則傳回 null.

peek() 取得(但不取出)佇列前端物件,若佇列為空則傳回 null.
//------------------------------------------------------------------------------------------------
想對佇列的前端與尾端進行操作,在前端加入物件與取出物件,在尾端加入與取出物件, Queue 的子介面 Deque 就定義了這類行為。

addFirst(), removeFirst(), getFirst().
addLast(), removeLast(), getLast().
操作失敗時會傳回例外

offerFirst(), pollFirst(), peekFirst().
offerLast(), pollLast(), peekLast().
操作物敗時會傳回特定值
//------------------------------------------------------------------------------------------------
排序收集的物件
java.util.Collection 提供有 sort() 方法,由於必須有索引才能進行排序,
因此 Collection 的 sort() 方法接受 List 實作的物件。

//------------------------------------------------------------------------------------------------


Raspberry Pi 安裝 WiringPi控制GPIO

WiringPi包含命令列的gpio函數庫工具,可以使用程式控制gpio,透過shell scripts讀寫。

1.      安裝git-core 套件,在安裝之前先更新及升級套件。

pi@raspberrypi ~ $ sudo apt-get update
pi@raspberrypi ~ $ sudo apt-get upgrade
pi@raspberrypi ~ $ sudo apt-get install git-core 

2.      使用Git 下載程式

git clone git://git.drogon.net/wiringPi 

3.      取得最新版本

pi@raspberrypi ~ $ cd wiringPi
pi@raspberrypi ~ / wiringPi $ git pull origin 

4.      如果已經是最新版本,可以執行以下指令:

pi@raspberrypi ~ $ cd wiringPi
pi@raspberrypi ~ / wiringPi $ sudo ./build

5.      測試WiringPi是否安裝完成

顯示版本:出現一些版權宣言,並告知這個軟體是免費的
pi@raspberrypi ~ / wiringPi $ gpio -v
gpio version: 2.29
Copyright (c) 2012-2015 Gordon Henderson
This is free software with ABSOLUTELY NO WARRANTY.
For details type: gpio -warranty

Raspberry Pi Details:  
Type: Model B, Revision: 2, Memory: 512MB, Maker: Egoman 
Device tree is enabled.
This Raspberry Pi supports user-level GPIO access.
    -> See the man-page for more details

顯示目前所有GPIO的輸入或輸出狀態
pi@raspberrypi ~ / wiringPi $ sudo gpio readall


參考網頁:
http://atceiling.blogspot.tw/2014/02/raspberry-pi-wiringpi-gpio.html#.VhTXvPmqpBc


Raspberry Pi 設置無線網路 (USB WiFi: Tenda RT5370)


1. 確認硬體資訊,使用 RT5370這張無線網卡做設定。建議使用的網卡有在清單中,才可隨插即用。

pi@raspberrypi ~ $ lsusb
          
Bus 001 Device 004: ID 148f:5370 Ralink Technology, Corp. RT5370 Wireless Adapter

2. 查看目前無線網路設定,一開始還沒連接上無線網路,所以狀態會是 “off”。

pi@raspberrypi ~ $ iwconfig wlan0
        
wlan0             IEEE 802.11bgn ESSID:off/any
                       Mode:Managed Access Point: Not-Associated Tx-Power=20 dBm
                       Retry short limit:7 RTS thr:off Fragment thr:off
                        Power Management:off

3. 掃描無線網路,我們會根據掃描結果來設定無線網路。假設本例的 SSID 為AAA,加密方式為 WPA2,使用的 pre-shared key 為1234567890。

pi@raspberrypi ~ $ sudo iwlist wlan0 scan
        
Cell 03 - Address: B8:55:10:E4:30:9C
               Channel:5
                Frequency:2.432 GHz (Channel 5)
                Quality=65/70 Signal level=-45 dBm
                Encryption key:on
                ESSID:"AAA "
                Bit Rates:1 Mb/s; 2 Mb/s; 5.5 Mb/s; 11 Mb/s; 6 Mb/s9 Mb/s; 12 Mb/s; 18 Mb/s
                Bit Rates:24 Mb/s; 36 Mb/s; 48 Mb/s; 54 Mb/s 

4. 修改 /etc/wpa_supplicant/wpa_supplicant.conf

pi@raspberrypi:~$ sudo nano /etc/wpa_supplicant/wpa_supplicant.conf
        
ctrl_interface=DIR=/var/run/wpa_supplicant GROUP=netdev
update_config=1
network={
                  ssid="AAA"
                  psk="123456789"proto=RSNkey_mgmt=WPA-PSKpairwise=CCMP auth_alg=OPEN
} 

5. 停用 wlan0 網卡。

pi@raspberrypi ~ $ sudo ifdown wlan0

6. 啟用 wlan0 網卡。

pi@raspberrypi ~ $ sudo ifup wlan0

7. 查尋 IP 位址,成功取得 192.168.1.14

pi@raspberrypi ~ $ ifconfig wlan0
        
wlan0   Link encap:Ethernet HWaddr c8:3a:35:c5:55:76
             inet addr:192.168.1.14 Bcast:192.168.1.255 Mask:255.255.255.0
             inet6 addr: fe80::7469:1703:e2e3:3afa/64 Scope:Link
             UP BROADCAST RUNNING MULTICAST MTU:1500 Metric:1
             RX packets:155 errors:0 dropped:0 overruns:0 frame:0
            TX packets:105 errors:0 dropped:0 overruns:0 carrier:0
            collisions:0 txqueuelen:1000
            RX bytes:34789 (33.9 KiB) TX bytes:13588 (13.2 KiB) 

Reference:

2015年10月2日 星期五

FreeCAD設計圖組裝

1. 把你畫好要組裝的圖檔一一匯出成 step 檔

匯出方式如下:
點左邊視窗左邊視窗(Label&Attributes) 的最後一層( ex.Fillet0002 ) ,讓右邊視野圖整個反綠之後
點左上的File ---> Export ( 匯出成 step 檔案類型 ),如底下附圖所示


2. 開新頁面組裝step檔

把 step 檔一一匯入 ---> File > Import

可以點左邊視窗( Label&Attributes ) 對每個物件改名字,如底下附圖所示


也可以更改物件的位置or角度 ---> 點選要更改的物件(右邊視野圖會反綠),Edit > Placement
修改元件的位置,也可以調角度,如底下附圖所示


調整完畢後可以點OK完成設定


3. 更改物件顏色

點左邊視窗( Label&Attributes ) 選取物件後,快捷鍵 Ctrl+D
可以針對線條或是填滿的顏色個別作更改