顯示具有 Debian 標籤的文章。 顯示所有文章

2015年7月25日 星期六

UnoJoy HexFiles Compile and Flash

系統環境:Debian Linux 8.0

一、下載 Source Code
UnoJoy 官方下載: https://github.com/AlanChatham/UnoJoy

二、安裝刷 Arduino 韌體工具
安裝 Flash 工具「dfu-programmer」及編譯工具「avr-gcc」:
su
apt-get update
apt-get install dfu-programmer
apt-get install gcc-avr avr-libc binutils-avr gdb-avr avrdude

三、燒入 Arduino .ino Code
以官方軟體 Arduino IDE 寫好程式,直接燒入。

四、編譯並燒至 Firmware

Step 1. Compile .c to .o
avr-gcc -DF_CPU=16000000UL -mmcu=atmega8u2 -funsigned-char -funsigned-bitfields -Os -fpack-struct -fshort-enums -Wall -c UnoJoy.c -o UnoJoy.o

avr-gcc -DF_CPU=16000000UL -mmcu=atmega8u2 -funsigned-char -funsigned-bitfields -Os -fpack-struct -fshort-enums -Wall -c usb_gamepad.c -o usb_gamepad.o

Step 2. Compile .o to .elf
avr-gcc -mmcu=atmega8u2 -o UnoJoy.elf UnoJoy.o usb_gamepad.o

Step 3. Compile .elf to .hex
avr-objcopy -O ihex -R .eeprom -R .fuse -R .lock -R .signature UnoJoy.elf UnoJoy.hex

Step 4. switch DFU mode
參考教學(適用 Arduino UNO R1/R2):https://www.arduino.cc/en/Hacking/DFUProgramming8U2
若是使用 Arduino UNO R3 版本,直接做短路 Reset 步驟,無需焊電阻。

可以使用 Linux 指令查看:
watch -n 1 'dmesg| grep -i arduino'

正常情況,
R1/R2 焊完 10K 電阻,短路後會顯示 DFU Mode;
而 R3 直接短路後,可能無輸出訊息。

Step 5. 燒入 Hex File 至 Flash Memory
(atmega8u2 晶片)
sudo dfu-programmer at90usb82 erase
sudo dfu-programmer at90usb82 flash UnoJoy.hex
sudo dfu-programmer at90usb82 reset

(atmega16u2 晶片)
sudo dfu-programmer atmega16u2 erase
sudo dfu-programmer atmega16u2 flash UnoJoy.hex
sudo dfu-programmer atmega16u2 reset

此時,將 Arduino 插入 Host 端會顯示為一支搖桿,
並且無法使用 Arduino IDE 做程式燒錄,
必須再燒 firmware 回原廠設定。

五、UnoJoy Joystick 回原為 Arduino UNO
找到檔案 Arduino-usbserial-uno.hex ,
同樣用 DFU Mode ,並以指令 dfu-programmer 指令做燒錄動作。

補充:自編一個 Makefile:
##############################################################################
# UnoJoy Test Makefile
##############################################################################
# AVR Libc Reference Manual
# http://www.atmel.com/webdoc/AVRLibcReferenceManual/group__util__delay.html

# Toolchain
OBJCOPY = avr-objcopy
CC = avr-gcc
F_CPU = -DF_CPU=16000000UL
MMCU = -mmcu=atmega8u2
C_FLAGS = $(F_CPU)
C_FLAGS += $(MMCU)
C_FLAGS += -funsigned-char
C_FLAGS += -funsigned-bitfields
C_FLAGS += -Os
C_FLAGS += -fpack-struct
C_FLAGS += -fshort-enums
C_FLAGS += -Wall

# Target source file
UNOJOY = UnoJoy
GAMEPAD= usb_gamepad
C_UNOJOY = $(UNOJOY).c
C_GAMEPAD = $(GAMEPAD).c

# Compile output file
O_UNOJOY = TEST_UnoJoy.o
O_GAMEPAD = TEST_gamepad.o
ELF_FILE = TEST.elf
HEX_FILE = TEST.hex
##############################################################################
all: $(ELF_FILE)
        @echo ============ HexFiles Creating ============
        $(OBJCOPY) -O ihex -R .eeprom -R .fuse -R .lock -R .signature $(ELF_FILE) $(HEX_FILE)

$(ELF_FILE): $(O_UNOJOY) $(O_GAMEPAD)
        @echo ============ ELF File Creating ============
        $(CC) $(MMCU) -o $@ $(O_UNOJOY) $(O_GAMEPAD)

$(O_UNOJOY): $(C_UNOJOY)
        @echo  ============ Compile $(C_UNOJOY) ============
        $(CC) $(C_FLAGS) -c $< -o $@

$(O_GAMEPAD): $(C_GAMEPAD)
        @echo ============ Compile $(C_GAMEPAD) ============
        $(CC) $(C_FLAGS) -c $< -o $@

clean:
        @echo "rm -f $(O_UNOJOY)" 
        @echo "rm -f $(O_GAMEPAD)"
        @echo "rm -f $(ELF_FILE)"
        @echo "rm -f $(HEX_FILE)"
        @echo ============ Clean: ALL ============
        @rm -f $(O_UNOJOY) $(O_GAMEPAD) $(ELF_FILE) $(HEX_FILE)


執行編譯檔案: make
清除編譯檔案:make clean


Reference:

  http://www.atmel.com/webdoc/AVRLibcReferenceManual/using_tools_1using_sel_gcc_opts.html


2015年6月27日 星期六

Bluetooth 藍芽配對連接

Debug 在置底。

---------------------------------------------------------------------
說明:筆者使用於筆電之內建藍芽與藍芽機械式鍵盤進行配對 。

*** 規格 ***
系統: Debian Jessie 8.0
核心:3.16.7
筆電:Acer v3-772g
鍵盤:ZIPPY BW7050
---------------------------------------------------------------------
查看無線驅動:
lspci -k|grep -iA2 Network
0d:00.0 Network controller: Qualcomm Atheros AR9462 Wireless Network Adapter (rev 01)
Subsystem: Foxconn International, Inc. Device e052
Kernel driver in use: ath9k
---------------------------------------------------------------------
檢查驅動:
lsmod |grep ath9k
lsmod |grep bluetooth
---------------------------------------------------------------------
安裝 bluetooth 套件:
apt-get update
apt-get install bluetooth bluez
apt-get upgrade -y
---------------------------------------------------------------------
啟動服務:
systemctl enable bluetooth.service
systemctl start bluetooth.service
systemctl status bluetooth.service
---------------------------------------------------------------------
設定檔:vi /etc/default/bluetooth
# Defaults for bluez-utils

# This file supersedes /etc/default/bluez-pan. If
# that exists on your system, you should use this
# file instead and remove the old one. Until you
# do so, the contents of this file will be ignored.

# start bluetooth on boot?
# compatibility note: If this variable is not found bluetooth will
# start
BLUETOOTH_ENABLED=1

# This setting will switch HID devices (e.g mouse/keyboad) to HCI mode, that is
# you will have bluetooth functionality from your dongle instead of only HID.
# Note that not every bluetooth dongle is capable of switching back to HID
# mode, see http://bugs.debian.org/cgi-bin/bugreport.cgi?bug=355497
HID2HCI_ENABLED=1
HID2HCI_UNDO=1
---------------------------------------------------------------------
常用指令:
hciconfig: 顯示本機藍芽裝置
hciconfig -a: 顯示本機藍芽裝置詳細資訊
hciconfig hci0 up/down: 啟用 / 關閉第一個藍芽裝置 ( hci0 )
hcitool dev: 顯示本機所有藍芽裝置address
hcitool scan: 搜尋周邊欄芽裝置
---------------------------------------------------------------------
無線裝置軟/硬體開關 (blocked:no 為裝置開啟):
sudo rfkill list
0: acer-wireless: Wireless LAN
Soft blocked: yes
Hard blocked: no
1: acer-bluetooth: Bluetooth
Soft blocked: no
Hard blocked: no
2: phy0: Wireless LAN
Soft blocked: yes
Hard blocked: yes
3: hci0: Bluetooth
Soft blocked: no
Hard blocked: no
sudo rfkill block all -----------> 關閉全部無線裝置
rfkill unblock bluetooth--------> 只開啟 bluetooth
---------------------------------------------------------------------
使用 bluetoothctl 指令配對連線:
bluetoothctl -----------> 進入 bleutoothctl 指令模式 exit 或 quit 可離開

以下為 [bluetooth]# 下的指令:
help
version
power on -------------> 開啟藍芽
list --------------------> 查看本機 Bluetooth
discoverable off -------> 筆電藍芽不開放給別人看到
pairable off ------------> 筆電藍芽不開放給別人配對
scan on ----------------> 開啟掃描,此時會抓到我的鍵盤 BT address
[NEW] Device AB:CD:EF:00:11:22 我的鍵盤 BT Address

開始連線 ( [bluetooth]# 下):
info AB:CD:EF:00:11:22 -----> 查看鍵盤藍芽裝置
pair AB:CD:EF:00:11:22 -----> 配對
trust AB:CD:EF:00:11:22 -----> 加到信任
unblock AB:CD:EF:00:11:22 -> 不阻擋
connect AB:CD:EF:00:11:22 -> 連線

此時沒意外話,可以連上鍵盤了。
---------------------------------------------------------------------
Debug

善用幾個指令 debug 看系統訊息,方便至 google 爬文。
dmesg | grep -i bluetooth
sudo grep bluetooth /var/log/syslog
systemctl status bluetooth
---------------------------------------------------------------------
Debug1

核心驅動問題
cd /usr/src/linux
make menuconfig

進入 -*- Networking support  ---> <M>   Bluetooth subsystem support  --->
--- Bluetooth subsystem support
  │ │    [ ]   Bluetooth 6LoWPAN support
  │ │       RFCOMM protocol support
  │ │    [*]     RFCOMM TTY support
  │ │       BNEP protocol support
  │ │    [*]     Multicast filter support
  │ │    [*]     Protocol filter support
  │ │       CMTP protocol support
  │ │       HIDP protocol support
  │ │          Bluetooth device drivers  --->

進入 -*- Networking support  ---> <M>   Bluetooth subsystem support  ---> Bluetooth device drivers  -->
 HCI USB driver 
  │ │     HCI SDIO driver
  │ │     HCI UART driver
  │ │    [*]   UART (H4) protocol support
  │ │    [*]   BCSP protocol support
  │ │    [*]   Atheros AR300x serial support
  │ │    [*]   HCILL protocol support
  │ │    [*]   Three-wire UART (H5) protocol support
  │ │     HCI BCM203x USB driver
  │ │     HCI BPA10x USB driver
  │ │     HCI BlueFRITZ! USB driver
  │ │     HCI DTL1 (PC Card) driver
  │ │     HCI BT3C (PC Card) driver
  │ │     HCI BlueCard (PC Card) driver
  │ │     HCI UART (PC Card) device driver
  │ │     HCI VHCI (Virtual HCI device) driver
  │ │     Marvell Bluetooth driver support
  │ │       Marvell BT-over-SDIO driver
  │ │     Atheros firmware download driver

save ---> exit
time make-kpkg --initrd --revision=$version kernel_image -j $CORE
dpkg -i linux-image-$version_amd64.deb
reboot
.
.
.
其他驅動問題,參考 http://ubuntuforums.org/showthread.php?t=2251009

至 http://drvbp1.linux-foundation.org/~mcgrof/rel-html/backports/ 下載對應核心之 backport 檔,接著做:
cd Desktop/backports-3.18-rc1-1
make defconfig-ath9k
make
sudo make install
sudo reboot
---------------------------------------------------------------------
Debut 2

hciconfig ------> 無輸出
hcitool dev ----> 無裝置
hcitool scan ---> 無輸出

查看無線 WiFi/Bluetooth 卡是不是 Atheros 的?
lspci -k |grep -i network

參考 http://unix.stackexchange.com/questions/146097/bluetooth-device-not-working-debian-wheezy
可以試試安裝
apt-get install firmware-atheros
---------------------------------------------------------------------
Debug 3

因本人在編譯其他軔體時,不小心誤將 Bluetooth 的其中一個 firmware 刪除或覆蓋,因此在開機的時候,就顯示如下圖:


使用以下指令也可以看到此錯誤訊息:
dmesg | grep -i bluetooth

使用下列指令去尋找 ar3k 這個資料夾:
find / -name ar3k

確實裏面找不到 ramps_0x11020100_40.dfu 這個檔案

可以到以下網址去下載:
http://git.kernel.org/cgit/linux/kernel/git/firmware/linux-firmware.git/tree/ar3k

將所缺失的檔案載入,就ok了。

然後在 reboot 。
---------------------------------------------------------------------


Reference:
https://wiki.debian.org/BluetoothUser


2015年6月15日 星期一

設定指令優先權(Java 安裝為例)


update-alternatives --install <連結> <名稱> <路徑> <優先權>
update-alternatives --config <指令>


範例來說明:
當我們想裝最新版本的 Java,但又本身電腦裝有舊版時,
但想要兩者皆保留,而目前需要使用的是最新版本。

1. 查看目前版本,下面 "1.7.0_79" 是舊版:
java -version
java version "1.7.0_79"
OpenJDK Runtime Environment (IcedTea 2.5.5) (7u79-2.5.5-1~deb8u1)
OpenJDK 64-Bit Server VM (build 24.79-b02, mixed mode)

2. 下載最新版本:
Java SE Development Kit 8u45

這邊我是選擇下載 jdk-8u45-linux-x64.tar.gz

3. 解壓縮
sudo tar xfva jdk-8u45-linux-x64.tar.gz -C /opt

4. 設定 PATH (一般USER)
cd ~
vi .bashrc
PATH=$PATH:/opt/jdk1.8.0_45/bin
source .bashrc

5. 新增優先權選項
sudo update-alternatives --install "/usr/bin/java" "java" "/opt/jdk1.8.0_45/bin/java" 1

6. 設定 /urs/bin/java 這指令優先權
sudo update-alternatives --config java
  選項       路徑                                          優先權  狀態
------------------------------------------------------------
* 0            /usr/lib/jvm/java-7-openjdk-amd64/jre/bin/java   1071      自動模式
  1            /opt/jdk1.8.0_45/bin/java                        0         手動模式
  2            /usr/lib/jvm/java-7-openjdk-amd64/jre/bin/java   1071      手動模式
選擇 1 ; enter

7. 檢查版本,要可以看到最新版
java -version
java version "1.8.0_45"
Java(TM) SE Runtime Environment (build 1.8.0_45-b14)
Java HotSpot(TM) 64-Bit Server VM (build 25.45-b02, mixed mode)


2015年6月6日 星期六

Wicd 網路管理程式(適用 Wireless)

一、 安裝
su
apt-get update
apt-get install wicd

二、 執行
wicd-client

三、 操作

 1. 開啟 WiFi,並搜尋可連線網路。

2. 若 WiFi 需要密碼,則選「特性」。

3. 設定密碼 ( 下次使用會記憶起來)

4. 點選「連線」,正常來講即可連上 WiFi

5. 使用完畢,可以直接「斷線」或「關閉 WiFi」。


Teamviewer 遠端連線程式

Teamviewer 遠端連線程式,可免去 VPN 直接控制,
Windows - Linux 都可以互相連線。
於 Debian Jessie 使用 Teamviewer 只能裝 i386 本版!


1. 下載
teamviewer_10.0.41499_i386.deb

2. 更新 ATP i386 套件庫
sudo dpkg --add-architecture i386
sudo apt-get update

3. 安裝
dpkg -i teamviewer_10.0.41499_i386.deb
apt-get -f install -y
dpkg -i teamviewer_10.0.41499_i386.deb

4. 執行 (一般使用者)
teamviewer

5. 下次開機不要啟動
因為 teamviewerd.service 開著的話,關機會很慢,
故設定下次開機不自動啟動,需要使用在開!

關閉:
sudo systemctl disable teamviewerd
sudo systemctl stop teamviewerd
sudo systemctl status teamviewerd

下次開機要使用:
sudo systemctl start teamviewerd
teamviewer


Reference:
http://steronius.blogspot.tw/2014/08/install-teamviewer-9-in-64bit-debain.html

2015年5月25日 星期一

筆電音量快捷鍵設定


讓筆電可以使用自訂義快捷鍵調音量,例如
Fn + Up
Fn + Down


說明,筆者用的
筆電: Acer V3-772G
系統: Debian Jessie
環境:IceWM
音控:ALSA
Kernel:3.16.7


一、請先確定音效卡已驅動,且音量控制正常

lspci -v

補充,我是手動設定音效裝置的方式:
 vi /etc/asound.conf
pcm.!default {
    type hw
    card 1    
    device 0
  }
  ctl.!default {
    type hw
    card 1 
  }

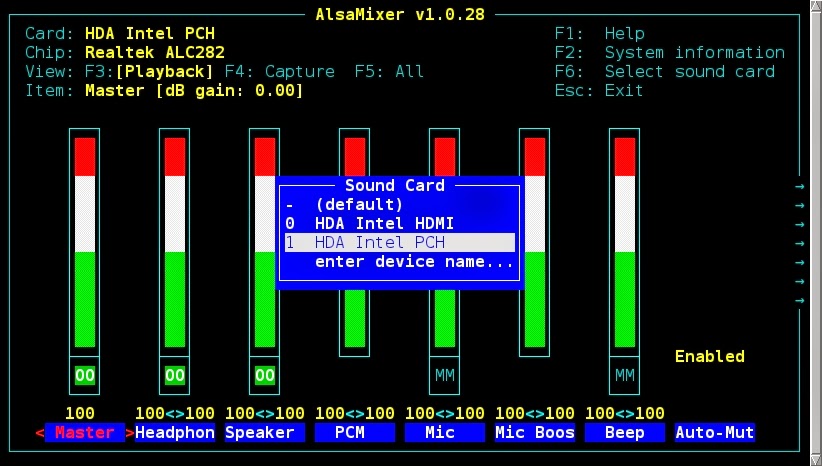
二、使用 ALSA 確認音效介面編號

alsamixer
F6

如圖所示,我的筆電主音量控制為 Card 1 / Master

三、編寫設定檔


vi /etc/X11/icewm/keys 
(也將 keys 設定檔放到 /homd/USER/.icewm/keys 路徑)
key "XF86AudioLowerVolume"      amixer -c 1 set Master 1%-
key "XF86AudioRaiseVolume"      amixer -c 1 set Master 1%+

設明:
"XF86AudioLowerVolume" 的意思為筆電 Fn + Down 之按鍵代號,反之。
amixer 是音控指令。
-c 1 是 Sound Card 1.
set Master 是控制 ALSA 的 Master 項。
1%+ 是單下按鍵增加總音量 1% (可依需求修改),反之 - 就是減少音量。

四、重啟 IceWM


五、其他應用,例如「截圖」快捷鍵設定

安裝截圖軟體 shutter

apt-get install shutter
vi /etc/X11/icewm/keys
key "Print" shutter -f
key "Alt+Print" shutter -w
key "Ctrl+Print" shutter -s


說明:
shutter -f  截全螢幕
shutter -w  截視窗
shutter -s  截選取區塊


Referencd:


2015年4月24日 星期五

pdftk 合併多個pdf

pdftk是一套用以處理pdf的程式,


sudo apt-get -y install pdftk


例如:

pdftk 1.pdf 2.pdf 3.pdf cat output 123.pdf

就可以合併多個pdf。

2015年4月4日 星期六

Cubieboard 自編 Cubieez image

編譯環境:
Ubuntu 12.04.5 LTS
arm-linux-gnueabihf-gcc-4.6
arm-linux-gnueabihf-g++-4.6
arm-linux-gnueabihf-cpp-4.6
安裝編譯所需之函式庫與程式:
$ sudo apt-get update
$ sudo apt-get upgrade
$ sudo apt-get install ia32-libs
$ sudo apt-get install ncurses-dev
$ sudo apt-get install build-essential git u-boot-tools
$ sudo apt-get install texinfo texlive ccache zlib1g-dev gawk bison flex gettext uuid-dev
$ sudo apt-get install build-essential u-boot-tools uboot-mkimage
$ sudo apt-get install binutils-arm-linux-gnueabihf gcc-arm-linux-gnueabi
$ sudo apt-get install gcc-arm-linux-gnueabihf cpp-arm-linux-gnueabihf
$ sudo apt-get install libusb-1.0-0 libusb-1.0-0-dev
$ sudo apt-get install git wget fakeroot kernel-package zlib1g-dev libncurses5-dev
加入 fex2bin bin2fex 工具:
$ git clone https://github.com/cubieboard/sunxi-tools
$ cd sunxi-tools
$ make
$ sudo cp fex2bin bin2fex /usr/bin
建立編譯工作環境:
$ cd ~
$ mkdir linux-sdk-card
$ cd linux-sdk-card
< Kernel Source >:
$ git clone https://github.com/cubieboard/linux-sdk-kernel-source.git
$ mv linux-sdk-kernel-source linux-sunxi
< Tools >:
$ git clone https://github.com/cubieboard/linux-sdk-card-tools.git
$ mv linux-sdk-card-tools tools
< Products >:
$ git clone https://github.com/cubieboard/linux-sdk-card-products.git
$ mv linux-sdk-card-products products
< Rootfs & U-boot >:
$ git clone https://github.com/cubieboard/linux-sdk-binaries.git
$ mv linux-sdk-binaries binaries
從下方網站下載 Rootfs & U-boot 檔案至剛剛建立的 binaries 資料夾中:
http://dl.cubieboard.org/model/commom/linux-sdk-binaries
< List >:
u-boot-a20.tar.gz               #Cubieboard a20 u-boot          需解壓縮
u-boot-v10.tar.gz               #Cubieboard a10 u-boot          需解壓縮
cubieez-lxde-20140916.tar.gz    #Cubieboard 1/2 Cubieez-rootfs  不需解壓縮
cubieez-ct-20140916.tar.gz      #Cubietruck Cubieez-rootfs      不需解壓縮
開始編譯:
$ cd ~/linux-sdk-card
$ source tools/scripts/envsetup.sh
進行環境設定如下所示:
Products
   0 - cb
   1 - cb2
   2 - ct 
please select a board:0
#由於作者的版子是Cubieboard 1 所以在這邊選擇 0 - cb
   0 - cb-cubieez
   1 - cb-cubieez-cs
   2 - cb-debian-server
please select a system:0
#我們想編譯的 OS 為 Cubieez 所以選擇 0 - cb-cubieez
Creating working dirs
選擇完設定後會出現下面訊息:
Build sdcard image:
1. tf card boot
(1)cb_build_card_image (compile code to prepare cb_install_tfcard)
(2)cb_install_tfcard  storage_medium dev_label [pack]
     storage_medium:nand tsd tfx2
     dev_label:     sdb sdc sdd ...
     pack:          the parameter mean we will make a img for dd or win32writer
     cmd for example:cb_install_tfcard tsd sdb

2. tsd or nand card boot
(1)cb_build_flash_card_image(compile code to prepare cb_install_flash_card)
(2)cb_install_flash_card storage_medium dev_label [pack]
     (install TF card to flash img to tsd/emmc sdx is your sdcard label pc)
     storage_medium:nand tsd (tfx2 do not need this mode)
     dev_label:     sdb sdc sdd ...
     pack:          the parameter mean we will make a img for dd or win32writer
     cmd for example:cb_install_flash_card tsd sdb
接下來也可以按照個人需求,自行編譯核心模組:
$ cd linux-sunxi/
$ cp ../products/cb/cb-cubieez/kernel_defconfig .config
$ make ARCH=arm CROSS_COMPILE=arm-linux-gnueabihf- menuconfig
選擇完之後儲存離開 menuconfig ,並且把 .config 丟回去剛剛 cp 過來的地方覆蓋kernel_defconfig,指令如下:
$ cp .config ../products/cb/cb-cubieez/kernel_defconfig
$ make mrproper
$ cd ../
mrproper 是將編譯核心環境重置,不然等等在跑編譯程式會出現 error

開始編譯 image 前先編輯一下編譯的 script 檔:
$ vim tools/scripts/boardenvsetup.sh
將 cb_build_linux() 還有 cb_build_card_image() 中的 -jX 改成自己的核心數以加快編譯速度

開始編譯,指令如下:
$ pwd
/home/icewnful/linux-sdk-card
$ cb_build_card_image
編譯完後會再次出現下面訊息:
Build sdcard image:
1. tf card boot
(1)cb_build_card_image (compile code to prepare cb_install_tfcard)
(2)cb_install_tfcard  storage_medium dev_label [pack]
     storage_medium:nand tsd tfx2
     dev_label:     sdb sdc sdd ...
     pack:          the parameter mean we will make a img for dd or win32writer
     cmd for example:cb_install_tfcard tsd sdb

2. tsd or nand card boot
(1)cb_build_flash_card_image(compile code to prepare cb_install_flash_card)
(2)cb_install_flash_card storage_medium dev_label [pack]
     (install TF card to flash img to tsd/emmc sdx is your sdcard label pc)
     storage_medium:nand tsd (tfx2 do not need this mode)
     dev_label:     sdb sdc sdd ...
     pack:          the parameter mean we will make a img for dd or win32writer
     cmd for example:cb_install_flash_card tsd sdb
在安裝 image 之前,要先把要當作Cubieboard 系統碟的 SD 卡插入電腦,然後 dmesg 確定為 sdx 開始安裝 image 至 SD 卡中,指令如下:
$ cb_install_flash_card nand sdx pack
pack 參數是為了讓它除了安裝進 SD 卡以外,也將 image 的內容 pack 成 .img 檔案,
以便我們要將系統轉移至別張 SD 卡中
最後就是就是把做好的SD卡放入Cubieboard中測試了!!

Cubieboard 編譯 xmame X視窗 & SDL 版本

首先安裝一些編譯 xmame 會用到的函式庫,指令如下:
# apt-get install build-essential libgtk2.0-dev libgnome2-dev libsdl1.2-dev libxv-dev libxv1

接下來開始 xmame 的部份:
$ mkdir xmame && cd xmame
$ wget http://caltaxcn.googlecode.com/files/xmame-0.106.tar.bz2
$ tar xfva xmame-0.106.tar.bz2
$ cd xmame-0.106
建立好環境之後要編輯它的 make 檔

Make_File 1. ./src/unix/unix.mak 
( to  X11 / SDL ):
CFLAGS.risc_lsb = -DALIGN_INTS -DALIGN_SHORTS -DLSB_FIRST
to CFLAGS.arm = -DALIGN_INTS -DALIGN_SHORTS -DLSB_FIRST
Make_File 2. ./makefile.unix
( to X11 / SDL ):
CFLAGS =                to #CFLAGS =
CFLAGS = -O2            to #CFLAGS =
MY_CPU = i386           to MY_CPU = arm
音效設定:
# SOUND_ESOUND = 1
SOUND_ALSA = 1
# SOUND_ARTS_TEIRA = 1
# SOUND_ARTS_SMOTEK = 1
SOUND_SDL = 1
# SOUND_WAVEOUT = 1
SDL joystick support.:
JOY_SDL = 1
輸出模式(擇一)
# X11 (including Glide & OpenGL if enabled below):
DISPLAY_METHOD = x11
# SDL library:
DISPLAY_METHOD = SDL
再來就可以 make 了,編譯結束後會在 xmame-0.106 的資料夾中出現 xmame.x11 或 xmame.SDL 的執行檔,最後跟 mame 一樣只要做 Soft Link 給系統就完成了,指令如下:
# ln -s ./xmame.x11 or SDL  /usr/bin/xmame.x11 or SDL
# ln -s ./xmame.x11 or SDL  /usr/local/bin/xmame.x11 or SDL
# ln -s ./xmame.x11 or SDL  /usr/game/xmame.x11 or SDL

Cubieboard 編譯 Mame + SDL2

編譯之前需要先確定編譯環境,至少要有 gcc、g++、cpp 才行,如果沒有請使用下列指令安裝:
# apt-get install arm-linux-gnueabihf-gcc arm-linux-gnueabihf-g++ arm-linux-gnueabihf-cpp 
由於我們是要編譯 Arm 版的 mame 所以需要安裝的是armhf的編譯套件。

接下來開始編譯進入 Mame 的部份
$ mkdir mame && cd mame
$ wget http://mamedev.org/downloader.php?file=releases/mame0159s.zip
$ unzip mame0159s.zip
$ unzip mame.zip
這時候會把 Mame-0.159 的編譯檔案都解出來在 mame資料夾中

再來做第一次編譯
$ make
有可能會遇到下列問題:

Mame_Error 1. alsa的函式庫未安裝,解決方法如下:
# apt-get install libasound2-dev
Mame_Error 2. moc error ,解決方法如下:
# apt-get install automoc
Mame_Error 3.
src/osd/sdl/sdlinc.h:5:22: fatal error: SDL2/SDL.h: 沒有此一檔案或目錄
compilation terminated.
make: *** [obj/sdl/osd/sdl/sdlos_unix.o] Error 1
這個問題是因為 Mame編譯時需要用到SDL2,而Cubieboard的套件只有SDL1的關係,所以我們必須自行編譯SDL2,解決方法如下:
$ mkdir SDL2 && cd SDL2
$ wget http://www.libsdl.org/release/SDL2-2.0.3.tar.gz
$ tar xfva SDL2-2.0.3.tar.gz && cd SDL2-2.0
$ ./configure
在configure中會出現 dbus 的 warning ,解決方法如下:
# apt-get install libdbus-1-dev
接下來重新執行./configure後就可以進行make了,指令如下:
$ make all
SDL2_Error 1 .
/home/cubie/SDL2/SDL2-2.0.3/src/render/opengles2/SDL_gles2funcs.h:70:1: error: unknown type name 'GLchar'
make: *** [build/SDL_render_gles2.lo] Error
解決方法如下:

先備份 /usr/include/GLES2/ 裡面的 gl2.h & gl2ext.h 檔案,然後到下列網站下載新的 gl2.h & gl2ext.h 檔。
http://blog.eldajani.net/banana-pi-arch-linux-snes-emulation-using-retroarch/
解決之後 make 就會成功了,然後安裝SDL,指令如下:
# make install
再來回到 Mame 的編譯
Mame_Error 4.
src/osd/modules/font/font_sdl.c:12:26: fatal error: SDL2/SDL_ttf.h: 沒有此一檔案或目錄
compilation terminated.
make: *** [obj/sdl/osd/modules/font/font_sdl.o] Error 1
這是因為SDL2的字型函式庫沒安裝,解決方法如下:
$ wget http://www.libsdl.org/projects/SDL_ttf/release/SDL2_ttf-2.0.12.tar.gz
$ tar xfva SDL2_ttf-2.0.12.tar.gz
$ cd SDL2_ttf-2.0.12
$ ./configure
$ make all
# make install
Mame_Error 5.
collect2: ld terminated with signal 9 [已砍掉]
make: *** [mame] Error 1
這個問題是因為編譯 Mame,把記憶體與 swap 用光造成崩潰的關係,所以我們必須手動增加 swap,指令如下:
# dd if=/dev/zero of=moreswap bs=1M count=512
# mkswap moreswap
# swapon moreswap
# swapon -s
再來就能正常編譯了,編譯完會在 mame 的資料夾中出現 mame 的執行檔,最後把執行檔做 Soft Link 至 /usr/bin  /usr/local/bin  /usr/game/ 中就可以了。指令如下:
# ln -s ./mame  /usr/bin/mame
# ln -s ./mame  /usr/local/bin/mame
# ln -s ./mame  /usr/game/mame

2015年1月10日 星期六

修改筆電螢幕亮度 Backlight


先說明,此文筆者用的
筆電: Acer V3-772G
系統: Debian Jessie
Kernel:3.16.7


一、當然要先有驅動
請自編核心,讓所有硬體驅動起來!

查看驅動:
lspci -v
lspci -k

二、修改設定檔
sudo vi /etc/default/grub

找到這一行:
GRUB_CMDLINE_LINUX=""

修改為
GRUB_CMDLINE_LINUX="acpi_osi=Linux acpi_backlight=vendor"

三、更新 grub
update-grub

四、重開機
要重新載入新的 grup 設定,需要重開機!
reboot


Reference:
http://eoffice.im.fju.edu.tw/phpbb/viewtopic.php?t=6862

http://www.linuxidc.com/Linux/2012-09/70417.htm

2014年12月31日 星期三

WiFi 手動無線網路 wlan0 連線


說明:

這邊介紹 iwconfig 的手動連線方法,
其中一點要注意的是,它不支援 WPA 加密格式,
它只適用 WEP 加密處理,因此以本校 STUST 為例是適用的!

零。入門


# 查看Wifi Driver型號,上網下載驅動程式


lspci
lspci -v
lspci -k


以我的電腦為例,輸出:

        
01:00.0 Network controller: Intel Corporation WiFi Link 5100
Subsystem: Intel Corporation WiFi Link 5100 AGN
        Flags: fast devsel, IRQ 16
        Memory at e3500000 (64-bit, non-prefetchable) [size=8K]
        Capabilities: [c8] Power Management version 3
        Capabilities: [d0] MSI: Enable- Count=1/1 Maskable- 64bit+
        Capabilities: [e0] Express Endpoint, MSI 00
        Capabilities: [100] Advanced Error Reporting
        Capabilities: [140] Device Serial Number 00-22-fb-ff-ff-66-59-5a
        Kernel driver in use: iwlwifi


# 安裝WiFi驅動


tar xfva /home/lin/MyDriver/iwlwifi-5000-ucode-5.4.A.11.tar.gz
cd iwlwifi-5000-ucode-5.4.A.11/
cp iwlwifi-5000-1.ucode /lib/firmware/
reboot

############################################################

壹。手動 iwconfig 無線網路設定

一、清除網路設定

1. 有線網路 eth0 清除

route del default eth0
ifconfig eth0 down

順便補充無線網路 wlan0 清除:
ifconfig wlan0 down
iwconfig wlan0 txpower off

二、 開啟無線網路

iwconfig wlan0 txpower on
ifconfig wlan0 up

三、掃描可用的無線 AP 站

iwlist wlan0 scan | grep -i essid

輸出如下:
                    ESSID:"Alias 4G"
                    ESSID:"stust_p203"
                    ESSID:"stust_p205"
                    ESSID:"EDIMAX"
                    ESSID:"S611-AP"
                    ESSID:"stust_p306"
                    ESSID:"S210B"
                    ESSID:"stust_teacher"
                    ESSID:"stust_p302"
                    ESSID:"stust_j304"
                    ESSID:"stust_teacher"
                    ESSID:"stust_s412@"
                    ESSID:"stust_teacher"
                    ESSID:"stust_p503"
                    ESSID:"stust_teacher"
                    ESSID:"stust_s314"
                    ESSID:"stust_j402"
                    ESSID:"stust_s414"
                    ESSID:"stust_s514"
                    ESSID:"p501_PM"

四、設定 ESSID

假設要連線上面掃到的 ESSID:"stust_p203"
iwconfig wlan0 essid stust_p503

檢查 ESSID 設定:
iwconfig wlan0

五、取得 IP

dhclient -v wlan0

成功取得後,即可得到 AP 所發出來的 ip !

--------------------------------------------------------------------------------

貳。修改網路設定檔 (可支援 WPA 加密格式 )

一、同上面方式清除 eth0,開啟 wlan0

1. 有線網路 eth0 清除

route del default eth0
ifconfig eth0 down

2. 開啟無線網路

iwconfig wlan0 txpower on
ifconfig wlan0 up

二、修改設定檔

vi /etc/network/interfaces

加入下面設定 (原本的網路不變動,或用 # 註解掉)
auto wlan0
iface wlan0 inet dhcp
       wpa-ssid        "AP-ESSID"
       wpa-psk         "password"

三、重啟網路

/etc/init.d/networking restart
或
service networking restart

四、查看有無找到 ip

ifconfig


參、推薦圖形操作軟體

Wicd 網路管理程式(適用 Wireless)


2014年12月16日 星期二

U-Boot 指令及建立 uEnv.txt


一、U-Boot 指令介紹

接續前一章節 Rootfs 植入 sdcard.img 開機 ,
當我們進入 U-Boot# 後 ,有以下幾個常用的指令介紹:

0. help

指令總覽

1. mmc

跟 SD/MMC 有關的指令及輸出。

下面 mmc list 可以印出,
目前裝置所接有的 SD Card 代號為 mmc 0
U-Boot# mmc list
OMAP SD/MMC: 0

下面 mmc part 可以印出,
mmc 0 這裝置之磁區分割 (Partition)
U-Boot# mmc part
Partition Map for MMC device 0  --   Partition Type: DOS

Part Start Sector Num Sectors UUID  Type
  1 2048       163840     925db895-01 0b Boot
  2 165888     1931264    925db895-02 83

下面 mmc info 可以看到目前 sd card 相關資訊。
U-Boot# mmc info
Device: OMAP SD/MMC
Manufacturer ID: aa
OEM: 5859
Name: QEMU! 
Tran Speed: 25000000
Rd Block Len: 512
SD version 1.0
High Capacity: No
Capacity: 1 GiB
Bus Width: 4-bit


2. bdinfo

查看嵌入式版子資訊,
其中比較需要注意的是第五行 -> start    = 0x80000000,
這跟我們載入開機的記憶體位址有關。
U-Boot# bdinfo
arch_number = 0x0000060A
boot_params = 0x80000100
DRAM bank   = 0x00000000
-> start    = 0x80000000
-> size     = 0x08000000
DRAM bank   = 0x00000001
-> start    = 0x88000000
-> size     = 0x08000000
eth0name    = usb_ether
ethaddr     = (not set)
current eth = usb_ether
ip_addr     = 
baudrate    = 115200 bps
TLB addr    = 0x8FFF0000
relocaddr   = 0x8FF4C000
reloc off   = 0x0FE4C000
irq_sp      = 0x8EF2BEE0
sp start    = 0x8EF2BED0

3. ls

查看 SD Card 內容之檔案目錄。

其中 mmc 0:1 是指 sdcard.img1:
U-Boot# ls mmc 0:1
  1852516   u-boot 
   392152   u-boot.bin 
    51100   mlo 
   392216   u-boot.img 
  2533720   uimage 

5 file(s), 0 dir(s)

其中 mmc 0:2 是指 sdcard.img2:
U-Boot# ls mmc 0:2
       4096 .
       4096 ..
      16384 lost+found
       4096 bin
       4096 boot
       4096 dev
       4096 etc
       4096 home
       4096 lib
       4096 media
       4096 mnt
       4096 opt
       4096 proc
       4096 root
       4096 run
       4096 sbin
       4096 selinux
       4096 srv
       4096 sys
       4096 tmp
       4096 usr
       4096 var

4. reset

重新啟動 U-Boot

5. printenv

印出 u-boot environment 設定檔。


二、建立 uEnv.txt


0. 進入 U-Boot#

參考前一章 Rootfs 植入 sdcard.img 開機 ,
最後面用 runsdcard.sh 進到 U-boot 內。
runsdcard.sh 內容如下:
qemu-system-arm -M beagle -m 512 -nographic -sd sdcard.img

1. printenv -> uEnv.txt

於 U-Boot# 內使用指令 printenv 將全部內容複製,
並貼上建立一個 uEnv.txt ,其原始內容如下:
arch=arm
baudrate=115200
beaglerev=C4
board=beagle
board_name=beagle
bootargs=console=ttyO2,115200n8 mpurate=auto buddy=none camera=none vram=12M omapfb.mode=dvi:640x480MR-16@60 omapdss.def_disp=dvi root=ubi0:rootfs ubi.mtd=4 rootfstype=ubifs
bootcmd=run findfdt; mmc dev ${mmcdev}; if mmc rescan; then if run userbutton; then setenv bootenv uEnv.txt;else setenv bootenv user.txt;fi;echo SD/MMC found on device ${mmcdev};if run loadbootenv; then echo Loaded environment from ${bootenv};run importbootenv;fi;if test -n $uenvcmd; then echo Running uenvcmd ...;run uenvcmd;fi;if run loadimage; then run mmcboot;fi;fi;run nandboot;setenv bootfile uImage;if run loadimage; then run loadfdt;run mmcbootz; fi;
bootdelay=1
bootdir=/
bootenv=uEnv.txt
bootfile=uImage
bootpart=0:1
buddy=none
camera=none
console=ttyO2,115200n8
cpu=armv7
defaultdisplay=dvi
dieid#=51454d5551454d555400000051454d55
dvimode=640x480MR-16@60
ethact=usb_ether
fdt_high=0xffffffff
fdtaddr=0x80f80000
fdtfile=omap3-beagle.dtb
findfdt=if test $beaglerev = AxBx; then setenv fdtfile omap3-beagle.dtb; fi; if test $beaglerev = Cx; then setenv fdtfile omap3-beagle.dtb; fi; if test $beaglerev = C4; then setenv fdtfile omap3-beagle.dtb; fi; if test $beaglerev = xMAB; then setenv fdtfile omap3-beagle-xm-ab.dtb; fi; if test $beaglerev = xMC; then setenv fdtfile omap3-beagle-xm.dtb; fi; if test $fdtfile = undefined; then echo WARNING: Could not determine device tree to use; fi;
importbootenv=echo Importing environment from mmc ...; env import -t $loadaddr $filesize
loadaddr=0x80000000
loadbootenv=fatload mmc ${mmcdev} ${loadaddr} ${bootenv}
loadfdt=run validatefdt; load mmc ${bootpart} ${fdtaddr} ${bootdir}/${fdtfile}
loadimage=load mmc ${bootpart} ${loadaddr} ${bootdir}/${bootfile}
loadramdisk=load mmc ${bootpart} ${rdaddr} ${bootdir}/${ramdisk}
mmcargs=setenv bootargs console=${console} ${optargs} mpurate=${mpurate} buddy=${buddy} camera=${camera} vram=${vram} omapfb.mode=dvi:${dvimode} omapdss.def_disp=${defaultdisplay} root=${mmcroot} rootfstype=${mmcrootfstype}
mmcboot=echo Booting from mmc ...; run mmcargs; bootm ${loadaddr}
mmcbootz=echo Booting with DT from mmc${mmcdev} ...; run mmcargs; bootz ${loadaddr} - ${fdtaddr}
mmcdev=0
mmcroot=/dev/mmcblk0p2 rw
mmcrootfstype=ext4 rootwait
mpurate=auto
nandargs=setenv bootargs console=${console} ${optargs} mpurate=${mpurate} buddy=${buddy} camera=${camera} vram=${vram} omapfb.mode=dvi:${dvimode} omapdss.def_disp=${defaultdisplay} root=${nandroot} rootfstype=${nandrootfstype}
nandboot=echo Booting from nand ...; run nandargs; nand read ${loadaddr} 280000 400000; bootm ${loadaddr}
nandroot=ubi0:rootfs ubi.mtd=4
nandrootfstype=ubifs
ramargs=setenv bootargs console=${console} ${optargs} mpurate=${mpurate} buddy=${buddy} vram=${vram} omapfb.mode=dvi:${dvimode} omapdss.def_disp=${defaultdisplay} root=${ramroot} rootfstype=${ramrootfstype}
ramboot=echo Booting from ramdisk ...; run ramargs; bootm ${loadaddr}
ramdisk=ramdisk.gz
ramroot=/dev/ram0 rw ramdisk_size=65536 initrd=0x81000000,64M
ramrootfstype=ext2
rdaddr=0x81000000
soc=omap3
stderr=serial
stdin=serial
stdout=serial
usbtty=cdc_acm
userbutton=if gpio input 173; then run userbutton_xm; else run userbutton_nonxm; fi;
userbutton_nonxm=gpio input 7;
userbutton_xm=gpio input 4;
validatefdt=if test $beaglerev = xMAB; then if test ! -e mmc ${bootpart} ${bootdir}/${fdtfile}; then setenv fdtfile omap3-beagle-xm.dtb; fi; fi;
vendor=ti
ver=U-Boot 2014.07 (Oct 14 2014 - 12:06:49)
vram=12M

2. 整理語法

先將 uEnv.txt 備份為 uEnv.txt.sh ,
並對其內容做語法整理,方便我們了解它寫的內容,
我的整理如下:
arch=arm
baudrate=115200
beaglerev=C4
board=beagle
board_name=beagle

bootargs=console=ttyO2,115200n8
         mpurate=auto
         buddy=none
         camera=none
         vram=12M
         omapfb.mode=dvi:640x480MR-16@60
         omapdss.def_disp=dvi
         root=ubi0:rootfs
         ubi.mtd=4
         rootfstype=ubifs

bootcmd=run findfdt;
        mmc dev ${mmcdev};
        if mmc rescan;  then
                if run userbutton; then
                        setenv bootenv uEnv.txt;
                else
                        setenv bootenv user.txt;
                fi;
                echo SD/MMC found on device ${mmcdev};
                if run loadbootenv; then
                        echo Loaded environment from ${bootenv};
                        run importbootenv;
                fi;
                if test -n $uenvcmd; then
                        echo Running uenvcmd ...;
                        run uenvcmd;
                fi;
                if run loadimage; then
                        run mmcboot;
                fi;
        fi;
        run nandboot;
        setenv bootfile uImage;
        if run loadimage; then
                run loadfdt;
                run mmcbootz;
        fi;

bootdelay=1
bootdir=/
bootenv=uEnv.txt
bootfile=uImage
bootpart=0:1
buddy=none
camera=none
console=ttyO2,115200n8
cpu=armv7
defaultdisplay=dvi
dieid#=51454d5551454d555400000051454d55
dvimode=640x480MR-16@60
ethact=usb_ether
fdt_high=0xffffffff
fdtaddr=0x80f80000
fdtfile=omap3-beagle.dtb

findfdt=if test $beaglerev = AxBx; then
                setenv fdtfile omap3-beagle.dtb;
        fi;
        if test $beaglerev = Cx; then
                setenv fdtfile omap3-beagle.dtb;
        fi;
        if test $beaglerev = C4; then
                setenv fdtfile omap3-beagle.dtb;
        fi;
        if test $beaglerev = xMAB; then
                setenv fdtfile omap3-beagle-xm-ab.dtb;
        fi;
        if test $beaglerev = xMC; then
                setenv fdtfile omap3-beagle-xm.dtb;
        fi;
        if test $fdtfile = undefined; then
                echo WARNING: Could not determine device tree to use;
        fi;

importbootenv=echo Importing environment from mmc ...;
              env import -t $loadaddr $filesize

loadaddr=0x80000000
loadbootenv=fatload mmc ${mmcdev} ${loadaddr} ${bootenv}
loadfdt=run validatefdt; load mmc ${bootpart} ${fdtaddr} ${bootdir}/${fdtfile}
loadimage=load mmc ${bootpart} ${loadaddr} ${bootdir}/${bootfile}
loadramdisk=load mmc ${bootpart} ${rdaddr} ${bootdir}/${ramdisk}

mmcargs=setenv bootargs console=${console} ${optargs} mpurate=${mpurate} buddy=${buddy} camera=${camera} vram=${vram} omapfb.mode=dvi:${dvimode} omapdss.def_disp=${defaultdisplay} root=${mmcroot} rootfstype=${mmcrootfstype}

mmcboot=echo Booting from mmc ...;
run mmcargs;
bootm ${loadaddr}

mmcbootz=echo Booting with DT from mmc${mmcdev} ...;
         run mmcargs;
         bootz ${loadaddr} - ${fdtaddr}

mmcdev=0
mmcroot=/dev/mmcblk0p2 rw
mmcrootfstype=ext4 rootwait
mpurate=auto

nandargs=setenv bootargs console=${console} ${optargs} mpurate=${mpurate} buddy=${buddy} camera=${camera} vram=${vram} omapfb.mode=dvi:${dvimode} omapdss.def_disp=${defaultdisplay} root=${nandroot} rootfstype=${nandrootfstype}

nandboot=echo Booting from nand ...;
         run nandargs;
         nand read ${loadaddr} 280000 400000;
         bootm ${loadaddr}

nandroot=ubi0:rootfs ubi.mtd=4
nandrootfstype=ubifs

ramargs=setenv bootargs console=${console} ${optargs} mpurate=${mpurate} buddy=${buddy} vram=${vram} omapfb.mode=dvi:${dvimode} omapdss.def_disp=${defaultdisplay} root=${ramroot} rootfstype=${ramrootfstype}

ramboot=echo Booting from ramdisk ...;
        run ramargs;
        bootm ${loadaddr}
ramdisk=ramdisk.gz
ramroot=/dev/ram0 rw ramdisk_size=65536 initrd=0x81000000,64M
ramrootfstype=ext2
rdaddr=0x81000000
soc=omap3
stderr=serial
stdin=serial
stdout=serial
usbtty=cdc_acm

userbutton=if gpio input 173; then
                run userbutton_xm;
           else
                run userbutton_nonxm;
           fi;

userbutton_nonxm=gpio input 7;
userbutton_xm=gpio input 4;

validatefdt=if test $beaglerev = xMAB; then
                if test ! -e mmc ${bootpart} ${bootdir}/${fdtfile}; then
                        setenv fdtfile omap3-beagle-xm.dtb;
                fi;
            fi;

vendor=ti
ver=U-Boot 2014.07 (Oct 14 2014 - 12:06:49)
vram=12M

3. 修改 uEnv.txt內容

我們看的是 uEnv.txt.sh ,
真正最後要載入 sdcard.img 的是 uEnv.txt ,
所以邊看 .sh 那份做修改,同時也要改 uEnv.txt,
兩者同步進行,改的主要項目為:

  • zImage -> uImage
  • loadaddr=0x80200000 -> loadaddr=0x80000000
  • bootpart=0:2 -> bootpart=0:1
  • mmcrootfstype=ext3 -> mmcrootfstype=ext4
  • bootdir=/boot -> bootdir=/

4. 植入 uEnv.txt -> sdcard1

將修變好的 uEnv.txt 植入到 sdcard partition 1 內。
mount -o loop,offset=$[512*2048] sdcard.img /mnt
rsync-av ~/qrmu_img/bootloader/uEnv.txt /mnt

5. 執行 runsdcard.sh

sh runsdcard.sh

執行結果,若正確的話,
應該要自動且快速通過 U-boot ,並直接載入 kernel ,
做正確的開機程序。


Reference:
http://pominglee.blogspot.tw/2013/12/uboot.html

http://pominglee.blogspot.tw/2014/12/uboot.html

2014年12月9日 星期二

Rootfs 植入 sdcard.img 開機


一、將 rootfs 植入到 sdcard.img

0. 準備材料

參考前面文章 建立虛擬 SD Card
sdcard1 要有以下檔案:
MLO、u-boot、u-boot.bin、u-boot.img、uImage

參考文章 建立 Rootfs
sdcard2 要有 rootfs

1. 先做備份

cp sdcard.img sdcard.img.bak

2. 做連接 + 掛載

前面幾個章節有學到兩個做 offset 的方法:

方法一:

su
losetup /dev/loop0 sdcard.img
losetup -o $[512*2048] /dev/loop1 /dev/loop0
losetup -o $[512*165888] /dev/loop2 /dev/loop0
mkdir /mnt/sdcard1
mkdir /mnt/sdcard2

mount /dev/loop1 /mnt/sdcard1
mount /dev/loop2 /mnt/sdcard2

方法二:

mkdir /mnt/sdcard1
mkdir /mnt/sdcard2
mount -o loop,offset=$[512*2048] sdcard.img /mnt/sdcard1
mount -o loop,offset=$[512*165888] sdcard.img /mnt/sdcard2

3. 設定 Rootfs 設定檔

參考前面章節 建立 Rootfs 其中的「四、設定 Rootfs」,
修改幾個檔案…
~/qemu_img/rootfs/etc/fstab
~/qemu_img/rootfs/etc/inittab
~/qemu_img/rootfs/etc/network/interfaces
~/qemu_img/rootfs/etc/resolv.conf
~/qemu_img/rootfs/etc/hostname

等 rootfs 完全整理好了,再一次全部 copy 到 /mnt/sdcard2 下。
rsync -av ~/qemu_img/rootfs/* /mnt/sdcard2

4. 做 sdcard 開機用 shell script

vi runsdcard.sh
qemu-system-arm -M beagle -m 512 -nographic -sd sdcard.img

5. 進入 U-Boot 開機進 ARM-Linux

run mmcargs
fatload mmc 0:1 0x80000000 uImage
bootm 0x80000000


2014年12月2日 星期二

建立橋接網路 br10


0. 整體架構圖
我們要將網路規劃為下圖,
由網際網路(Internet) 連到實體機網卡(eth0),
從實體機網卡(eth0) 建立一個橋接網路(br10),
最後將橋接網路連接到 QEMU 虛擬機( 設 192.168.10.20 ),
並在虛擬機上面建個 Web Server !

其中,從實體機到虛擬機可以互相 ping ,
且實體機開瀏灠器可以連到虛擬機架的 Web Server。

1. 使用 runarm.sh 開啟虛擬機
參考文章 用 QEMU 來開機 arm.img ,
vi runarm.sh
# !/bin/bash
#
# Run arm.img

qemu-system-arm -M versatilepb -m 512 \
-kernel ~qemu_image/vmlinuz-3.2.0-4-versatile \
-initrd ~qemu_image/initrd.img-3.2.0-4-versatile \
-hda ~qemu_image/arm.img \
-append "root=/dev/sda1" &

2. 安裝 Web server
於虛擬機,安機:
sudo apt-get install apache2

虛擬機關機
halt

3. 備份並修改 runarm.sh
cp runarm.sh runarm.sh.org

vi runarm.sh
qemu-system-arm -M versatilepb -m 512 \
-kernel ~qemu_image/vmlinuz-3.2.0-4-versatile \
-initrd ~qemu_image/initrd.img-3.2.0-4-versatile \
-hda ~qemu_image/arm.img \
-net nic,macaddr=" MAC Address " -net bridge,br=br10 \
-append "root=/dev/sda1" &

4. 安裝 bridge 套件
於實體機
sudo apt-get install bridge-utils uml-utilities

5. 編輯設定 br10 (以 P503 教室為例)
於實體機
vi /etc/network/interfaces

## ==== 本機端 lo ====
auto lo
iface lo inet loopback
## ==== 實體網卡 eth0 ====
allow-hotplug eth0
#iface eth0 inet dhcp
iface eth0 inet static
 address 120.117.72.XX
 netmask 255.255.255.128
 gateway 120.117.72.126
 dns-nameserver 120.117.2.1
## ==== 橋接 br10 ====
auto br10
iface br10 inet static
 address 192.168.10.1
 netmask 255.255.255.0
# 這邊 gateway 是用實體機 eth0 的 ip
 gateway 120.117.72.XX
 bridge_ports tap0
 bridge_fd 9
 bridge_hello 2
 bridge_maxage 12
 bridge_stp off

6. 重啟網卡並確認網路連線
於實體機
/etc/init.d/networking restart
brctl show
ifconfig
ping 192.168.10.1
ping 8.8.8.8

7. 設定 QEMU 設定檔
於實體機
sudo chmod u+s /usr/local/libexec/qemu-bridge-helper

sudo vi /usr/local/etc/qemu/bridge.conf
allow br10

8. 執行修改好的 runarm.sh 重啟虛擬機
於實體機
sh runarm.sh

9. 修改虛擬機網路設定
於虛擬機
vi /etc/network/interfaces
auto lo
iface lo inet loopback
## ==== 虛擬機的 eth0 ====
allow-hotplug eth0
iface eth0 inet static
 address 192.168.10.20
 netmask 255.255.255.0
# 這邊 gateway 要設實體機所建的 br10 之 ip
 gateway 192.168.10.1
# 這邊以學校為例,nameserver 要用同實體機一樣
 dns-nameserver 120.117.2.1

10. 重啟虛擬機網卡並測試
於虛擬機
/etc/init.d/networking restart

測試 br10
ping 192.168.10.1

測試實體機 eth0
ping 120.117.72.XX

啟動 Web Server
/etc/init.d/apache2 restart

11. 至實體機測試
於實體機
ping 192.168.10.20

開啟瀏灠器 -> 192.168.10.20
可以看到 「It's works!!」

12. 設定防火牆,讓虛擬機連到外網
於實體機
echo 1 > /proc/sys/net/ipv4/ip_forward
iptables -A INPUT -i br10 -j ACCEPT
iptables -t net -A POSTROUTING -s 192.168.10.0/24 -o eth0 -j MASQUERADE


Reference:
http://pominglee.blogspot.tw/2014/12/br10.html

2014年11月25日 星期二

Openshot 影像處理軟體

Openshot 主要功能為影片的剪輯、修改,
最大的強項是「穩定、快速、直覺」,
可以直接匯入影片,並且穩穩的跑出影像和聲音,
完全不用調整任何設定!

一、安裝
sudo apt-get update && apt-get install openshot

二、執行
一般 user 下,直接執行 openshot,介面如下:


三、操作

通常進來 openshot 後,第一步驟是「匯入檔案」,
接著,將影音檔拉到下方的影音軌。


可以點上面的「+ 加入影音軌」,可用於穿插字幕、聲音、動畫、其它影像…等,而按右鍵可以「移除影音軌」。

拉動紅色線,選好位置後可以「加入標記」,插入後,
可以方便做剪輯,於紅線上方點右鍵可以依紅線位置下
「全部剪輯切片」,之後可以針對需求做片段的特效,
或改部份片段影片的速度…等等。

基本上,使用都很直覺,
以非藝術工作專業的使用者來說已經相當夠用,

最後剪輯完記得「匯出視訊」,我設定匯出 .avi 如下圖:


Reference:
http://way3sec.blogspot.tw/2010/04/openshot-video-editor.html

建立 Rootfs


一、先準備 arm.img 檔

0. 位置目錄(一般 User 權限)

cd ~/qemu_img

1. 參考 建立一個 arm.img 來建立 arm.img。


2. 做一個最原始檔案的備份

cp arm.img arm_OK.img

3. 將 QEMU 開機

參考 用 QEMU 來開機 arm.img 第 6 步驟
sh runarm.sh

二、第一階段 Rootfs 瘦身

0. 位置

用 QEMU 開啟 arm.img ,登入 Root ,在 QEMU 內瘦身。

1. ATP 更新、清除

apt-get update
apt-get clean
rm -rf /var/lib/apt/lists/*
rm -rf /var/cache/apt/pkgcache.bin
rm -rf /var/cache/apt/srcpkgcache.bin

2. 已安裝套件 (依需求選擇)

視窗環境、瀏灠器等,看有沒有需求,
也可以選擇移除還是留著:
apt-get remove xorg iceweasel

3. 關機 QEMU


三、第二階段 Rootfs 瘦身

0. 位置 (一般 user)

cd ~/qemu_img

1. 做備份紀錄

這邊備份的檔名,以今天日期 arm_1125.img 來做備份。
qemu-img -O raw arm.img arm_1125.img

2. 掛載 arm.img

可以參考 建立虛擬 SD Card 的 loset、mount 步驟,
下面是用較快速的方法來掛載,概念一樣 (要做 offset )。
mount -o loop, offset=`expr 512 \* 2048` arm.img /mnt

3. 建立裝 Rootfs 的資料夾

mkdir ~/qemu_img/rootfs

4. 複製 (ROOT)

將 arm.img 內的檔案複製到 rootfs
rsync -av /mnt/* ~/qemu_img/rootfs/

5. 開始檔案瘦身,刪除不必要的檔案(ROOT)

切記,此步驟在 root 權限下,要非常小心,
注意目錄位置,不要刪錯檔案了!

下面幾個,可以直接刪除:
rm -rf ~/qemu_img/rootfs/root/.cache
rm -rf ~/qemu_img/rootfs/root/.mozilla
rm -rf ~/qemu_img/rootfs/usr/share/man/*
rm -rf ~/qemu_img/rootfs/usr/share/doc/*
rm -rf ~/qemu_img/rootfs/boot/*
rm -rf ~/qemu_img/rootfs/dev/.udev
rm -rf ~/qemu_img/rootfs/var/log/*

這邊有兩個資料夾,要刪除語系資料,
只留我們需要的:

~/qemu_img/rootfs/usr/share/locale/
我們留 en_US、zh_TW,其它殺掉,
可以使用 rm 或 mc 指令來留、刪。

~/qemu_img/rootfs/usr/share/i18n/locale/
這邊留 C、POSIX、en_US、zh_TW,其它殺掉,
一樣可以使用 rm 或 mc 指令來留、刪。

接下來是核心 modules ,一樣刪除,接著
參考文章 編譯 ARM Linux 核心,第七步驟,
把我們做好的模組複製進來該目錄:
rm -rf ~/qemu_img/rootfs/lib/modules/3.2.0-4-versatib
rsync -av ~/qemu_img/kernel/modules/lib/3.4.100 ~/qemu_img/rootfs/lib/modules/

全部瘦身完後,可以在目錄下,
用指令來查看各個目錄中容量較大的東西有哪幾項:
du -sh * | grep M

~/qemu_img/rootfs 目錄,輸出如下:
5.9M  bin
4.7M  boot
4.4M etc
42M lib
5.1M sbin
354M  usr
37M  var

~/qemu_img/rootfs/usr 目錄,輸出如下:
36M bin
192M lib
4.3M sbin
122M share

6. 卸載 arm.img

先看一下 /mnt 有沒有在使用中,卸載需要離開該目錄。
lsof /mnt

卸載
umount /mnt

解除連接(注意順序 大 -> 小)
losetup -a
losetup -d /dev/loop1
losetup -d /dev/loop0
losetup -a

四、設定 Rootfs

1. ~/qemu_img/rootfs/etc/fstab

改成我們需要的設定:
proc            /proc        proc    defaults           0   0
/dev/mmcblk0p2   /           auto   errors=remount-ro   0   1
/dev/mmcblk0p1   /boot       auto   defaults            0   0

2. ~/qemu_img/rootfs/etc/inittab

最後一行加上:
T2:23:respawn:/sbin/getty -L ttyO2 115200 vt102

3. ~/qemu_img/rootfs/etc/network/interfaces

# The loopback network interface
auto lo
iface lo inet loopback

# The primary network interface
allow-hotplug eth0
iface eth0 inet dhcp

4. ~/qemu_img/rootfs/etc/resolv.conf

nameserver 8.8.8.8

5. ~/qemu_img/rootfs/etc/hostname

隨便自訂 (例如 leenix)

五、放到 sdcard.img 中

參考 建立虛擬 SD Card 的掛載方式,
將 Rootfs 放至到 sdcard.img 第二分割區。

sdcard1 -> 第 1 個分割區,FAT 16/32 格式,有打開開機旗標,
內含檔案:
-rwxr-xr-x 1 root root   45128 2012-10-30 22:19 MLO
-rwxr-xr-x 1 root root 1215711 2012-10-30 22:19 u-boot
-rwxr-xr-x 1 root root  294672 2012-10-30 22:19 u-boot.bin
-rwxr-xr-x 1 root root  294736 2012-10-30 22:19 u-boot.img
-rwxr-xr-x 1 root root       1 2012-10-30 23:29 uEnv.txt
-rwxr-xr-x 1 root root 2475616 2012-10-30 22:15 uImage

sdcard2 -> 第 2 個分割區,ext4 格式,內含 rootfs 的檔案。


Reference:
http://pominglee.blogspot.tw/2012/10/rootfs.html

http://pominglee.blogspot.tw/2012/11/rootfs.html

2014年11月22日 星期六

gtk-recordmydesktop 錄影工具

一、安裝

apt-get install gtk-recordmydesktop recordmydesktop ffmpeg

二、操作

1. 開啟軟體

gtk-recordmydesktop

2. 出現操作介面,如圖


3. 按紅點,開始錄影錄音…


4. 完成錄影

Ctrl + Alt + S

5. 輸出到家目錄或指定目錄


6. 轉檔 .ogv -> .avi

ffmpeg -i out.ogv -vcodec mpeg4 -sameq -acodec libmp3lame out.avi

三、其他

1. 錄音

可以安裝 gnome-alsamixer ,
用來調整 Mic 的音量設定,

我的 Mic 是插主機後方,設定如下圖:

2. 播放

可以使用 mplayer 播 .ogv 格式之影片檔。

3.整理 Shell Script 快速轉檔

vi toAVI.sh
# !/bin/bash
# .ogv to .avi

if [ -z $1 ] || [ -z $1 ] ;then
        echo
        echo ====== Usage =========
        echo "toAVI.sh [input.ogv] [output.avi]" 
        exit 0
fi

ffmpeg -i $1 -vcodec mpeg4 -sameq -acodec libmp3lame $2


Reference:
http://blog.longwin.com.tw/2009/04/linux-record-recordmydesktop-2009/

http://www.cyberciti.biz/faq/linux-unix-bsd-appleosx-convert-ogv-to-avi-video-audio/

2014年11月4日 星期二

u-boot 編譯

~/qemu_image/bootloader -> 放置 u-boot

一、安裝 toolchain

參考前面文章 安裝 ARM toolchain

二、下載 u-boot


本文下載最新版 u-boot-latest.bz2 (u-boot-2014-07)

mkdir -p ~/qemu_image/bootloader
cd ~/qemu_image/bootloader
wget ftp://ftp.denx.de/pub/u-boot/u-boot-latest.bz2
tar xfva  u-boot-latest.bz2

會得到目前最新版 u-boot-2014.10 。

三、查看設定參數

先設我們要用板子是 Beagle Board…
cd ~/qemu_image/bootloader/u-boot-2014.10/
vi boards.cfg

內容如下(可以得知參數為 omap3_beagle ):
omap3_beagle                 arm         armv7       beagle              ti             omap3

下指令設定參數 config
make ARCH=arm CROSS_COMPILE=arm-linux-gnueabi- omap3_beagle_config

設定完成會出現:
Configuring for omap3_beagle board...

四、編譯 u-boot

make ARCH=arm CROSS_COMPILE=arm-linux-gnueabi- all -j ${core number}

編完會出現四個檔案:
MLO
u-boot
u-boot.bin
u-boot.img

五、測試 u-boot 開機

cat MLO u-boot u-boot.bin u-boot.img > sd.img
qemu-system-arm -M beagle -nographic -sd sd.img

結果會因為沒核心,而當機,如下輸出:
U-Boot SPL 2012.07 (Oct 04 2012 - 11:43:34)
Texas Instruments Revision detection unimplemented
OMAP SD/MMC: 0
mmc_init_stream: timedout waiting for cc!
spl: mmc init failed: err - -19
### ERROR ### Please RESET the board ###


離開 QEMU 方法:
先按 Ctrl + A
放開 Ctrl + A
再單按 X 鍵

Debug
開虛擬機出現下面訊息:
qemu: hardware error: no boot device found
CPU #0:
R00=00000000 R01=00000000 R02=00000000 R03=00000000
R04=00000000 R05=00000000 R06=00000000 R07=00000000
R08=00000000 R09=00000000 R10=00000000 R11=00000000
R12=00000000 R13=00000000 R14=00000000 R15=400140a4
PSR=400001d3 -Z-- A svc32
s00=00000000 s01=00000000 d00=0000000000000000
s02=00000000 s03=00000000 d01=0000000000000000
s04=00000000 s05=00000000 d02=0000000000000000
s06=00000000 s07=00000000 d03=0000000000000000
s08=00000000 s09=00000000 d04=0000000000000000
s10=00000000 s11=00000000 d05=0000000000000000
s12=00000000 s13=00000000 d06=0000000000000000
s14=00000000 s15=00000000 d07=0000000000000000
s16=00000000 s17=00000000 d08=0000000000000000
s18=00000000 s19=00000000 d09=0000000000000000
s20=00000000 s21=00000000 d10=0000000000000000
s22=00000000 s23=00000000 d11=0000000000000000
s24=00000000 s25=00000000 d12=0000000000000000
s26=00000000 s27=00000000 d13=0000000000000000
s28=00000000 s29=00000000 d14=0000000000000000
s30=00000000 s31=00000000 d15=0000000000000000
s32=00000000 s33=00000000 d16=0000000000000000
s34=00000000 s35=00000000 d17=0000000000000000
s36=00000000 s37=00000000 d18=0000000000000000
s38=00000000 s39=00000000 d19=0000000000000000
s40=00000000 s41=00000000 d20=0000000000000000
s42=00000000 s43=00000000 d21=0000000000000000
s44=00000000 s45=00000000 d22=0000000000000000
s46=00000000 s47=00000000 d23=0000000000000000
s48=00000000 s49=00000000 d24=0000000000000000
s50=00000000 s51=00000000 d25=0000000000000000
s52=00000000 s53=00000000 d26=0000000000000000
s54=00000000 s55=00000000 d27=0000000000000000
s56=00000000 s57=00000000 d28=0000000000000000
s58=00000000 s59=00000000 d29=0000000000000000
s60=00000000 s61=00000000 d30=0000000000000000
s62=00000000 s63=00000000 d31=0000000000000000
FPSCR: 00000000
已經終

解決:
fdisk sd.img
a
1
w

將開機選項 * 加到 sd.img 第一分割區。


Reference:

安裝 ARM toolchain

官網 Embedded Debian Linux

一、加入 ARM Toolchain 鏡像站位置

sudo vi /etc/apt/sources.list

加入鏡像站 (squeeze)
deb http://www.emdebian.org/debian/ squeeze main

如果上面的鏡像站掛了,可以試試下面的鏡像站 (2014/12/02 更新,來源在此)
deb http://emdebian.bytesatwork.ch/mirror/toolchains squeeze main

二、更新及安裝

1. 先更新套件

sudo apt-get update

要有看到更新到 http://www.emdebian.org squeeze/main .......... 的東東。

#########################################################################
Debug 1:
W: GPG error: http://www.emdebian.org wheezy Release: 由於無法取得它們的公鑰,以下簽章無法進行驗證: NO_PUBKEY B5B7720097BB3B58

解決 1:
apt-get install emdebian-archive-keyring
#########################################################################

2. 安裝 toolchain

sudo apt-get install gcc-4.4-arm-linux-gnueabi cpp-4.4-arm-linux-gnueabi g++-4.4-arm-linux-gnueabi

#########################################################################
Debug 2:
以 apt 安裝 toolchaain 出現錯誤訊息:

有些套件無法安裝。這可能意謂著您的要求難以解決,或是若您使用的是
unstable 發行版,可能有些必要的套件尚未建立,或是被移出 Incoming 了。
以下的資訊或許有助於解決當前的情況:

下列的套件有未滿足的相依關係:
 cpp-4.4-arm-linux-gnueabi : 相依關係: libgmp3c2 但它卻無法安裝
 g++-4.4-arm-linux-gnueabi : 相依關係: libgmp3c2 但它卻無法安裝
E: 無法修正問題,您保留 (hold) 了損毀的套件。

Sol 2:
到 Debian 官方下載 libgmp3c2_4.3.2 ,接著:
sudo dpkg -i libgmp3c2_4.3.2+dfsg-1_amd64.deb
#########################################################################

三、做 sub-link

sudo ln -s /usr/bin/arm-linux-gnueabi-gcc-4.4 /usr/bin/arm-linux-gnueabi-gcc
sudo ln -s /usr/bin/arm-linux-gnueabi-g++-4.4 /usr/bin/arm-linux-gnueabi-g++
sudo ln -s /usr/bin/arm-linux-gnueabi-cpp-4.4 /usr/bin/arm-linux-gnueabi-cpp


四、測試及驗證

1. 先看一般 x86_64 的 gcc 版本:

gcc -v

其輸出:
Using built-in specs.
COLLECT_GCC=gcc
COLLECT_LTO_WRAPPER=/usr/lib/gcc/x86_64-linux-gnu/4.7/lto-wrapper
Target: x86_64-linux-gnu
Configured with: ../src/configure -v --with-pkgversion='Debian 4.7.2-5' --with-bugurl=file:///usr/share/doc/gcc-4.7/README.Bugs --enable-languages=c,c++,go,fortran,objc,obj-c++ --prefix=/usr --program-suffix=-4.7 --enable-shared --enable-linker-build-id --with-system-zlib --libexecdir=/usr/lib --without-included-gettext --enable-threads=posix --with-gxx-include-dir=/usr/include/c++/4.7 --libdir=/usr/lib --enable-nls --with-sysroot=/ --enable-clocale=gnu --enable-libstdcxx-debug --enable-libstdcxx-time=yes --enable-gnu-unique-object --enable-plugin --enable-objc-gc --with-arch-32=i586 --with-tune=generic --enable-checking=release --build=x86_64-linux-gnu --host=x86_64-linux-gnu --target=x86_64-linux-gnu
Thread model: posix
gcc version 4.7.2 (Debian 4.7.2-5)

2. 接著看 ARM 版 gcc 版本:

arm-linux-gnueabi-gcc -v

其輸出:
Using built-in specs.
Target: arm-linux-gnueabi
Configured with: ../src/configure -v --with-pkgversion='Debian 4.4.5-8' --with-bugurl=file:///usr/share/doc/gcc-4.4/README.Bugs --enable-languages=c,c++,fortran,objc,obj-c++ --prefix=/usr --program-suffix=-4.4 --enable-shared --enable-multiarch --enable-linker-build-id --with-system-zlib --libexecdir=/usr/lib --without-included-gettext --enable-threads=posix --with-gxx-include-dir=/usr/arm-linux-gnueabi/include/c++/4.4.5 --libdir=/usr/lib --enable-nls --enable-clocale=gnu --enable-libstdcxx-debug --enable-objc-gc --disable-sjlj-exceptions --enable-checking=release --program-prefix=arm-linux-gnueabi- --includedir=/usr/arm-linux-gnueabi/include --build=x86_64-linux-gnu --host=x86_64-linux-gnu --target=arm-linux-gnueabi --with-headers=/usr/arm-linux-gnueabi/include --with-libs=/usr/arm-linux-gnueabi/lib
Thread model: posix
gcc version 4.4.5 (Debian 4.4.5-8)

五、編寫程式測試

1. 寫一個 hello.c

vi hello.c
#include 
main(){
printf("Hello, World\n");
}


2. 編譯(x86_64):

gcc hello.c -o hello
file hello

輸出:
hello: ELF 64-bit LSB executable, x86-64, version 1 (SYSV), dynamically linked (uses shared libs), for GNU/Linux 2.6.26, BuildID[sha1]=0x320c1bcd829c0a6407a0331f5243f03110656ee8, not stripped

可能在 x86_64 的機器下直接執行:
./hello

輸出:
Hello, World

3. 編譯(arm):

arm-linux-gnueabi-gcc hello.c -o hello_arm
file hello_arm

輸出:
hello_arm: ELF 32-bit LSB executable, ARM, version 1 (SYSV), dynamically linked (uses shared libs), for GNU/Linux 2.6.18, BuildID[sha1]=0x629d4407541731dc7c773ccd05d5bcb4811fa0e9, not stripped

只能在 ARM 的機器下才可以執行。


六、安裝 Jessie 版 ARM Toolchains

參考官方的方法:https://wiki.debian.org/CrossToolchains

1. 加入鏡像站到 /etc/apt/sources.list

deb http://emdebian.org/tools/debian/ jessie main

2.安裝 archive key

curl http://emdebian.org/tools/debian/emdebian-toolchain-archive.key | sudo apt-key add -

3. 更新並安裝套件

sudo dpkg --add-architecture armhf 
sudo apt-get update 
sudo apt-get install crossbuild-essential-armhf